VoIP:VTX Teams Connect
From VTX Public Wiki
With VTX Teams Connect, use Microsoft Teams as your main Telephony Solution with real fix numbers. VTX will take care of bridging Microsoft Cloud with the rest of the telephony networks for you allowing you to use one single tool for all your communication needs : Microsoft Teams

| 2026-01-21: Add support for Dial Plan to allow emergency and short number calls directly in create and delete routing script in version 4.7+ 2022-12-23: Virtual Teams: You can now dial VTX VoIP platform features from Teams client too, cf VoIP:VTX_Teams_Virtual#Allow_VTX_Feature_Codes_:_Add_a_dialplan_to_dial_.2A.3Ccode.3E_and_.23.3Ccode.3E_on_the_VTX_VPBX |
Introduction[edit | edit source]
The purpose of this page is to explain how to setup and manage a VTX Teams Connect service to integrate it within your Microsoft 365 domain. A presentation of the service is available at https://www.vtx.ch/fr/corporate/telephonie/teams-connect and https://www.vtx.ch/de/corporate/telephonie/teams-connect
Setup Process Overview[edit | edit source]
Here is the process that will allow you to setup the service
- Follow requirements below VoIP:VTX Teams Connect#Requirements
- Order VTX Teams Connect: You need to order a VTX Teams Connect service at VoIP:VTX Teams Connect#VTX_Teams_Connect
- Order Microsoft 365: You need to have or order a Microsoft 365 account at VoIP:VTX Teams Connect#A_Microsoft_365_domain_and_accounts
- Powershell: Use a Windows PC or Server to create routing and assign numbers at VoIP:VTX Teams Connect#Microsoft_Windows_PC.2FServer_with_Powershell
- Setup Domain in VTX Kiosk: You will link your VTX Teams Connect domain with your Microsoft account at VoIP:VTX Teams Connect#Link_your_.3CSERVICE_NUMBER.3E.teams.ipvoip.ch_Domain_between_Microsoft_and_VTX_Telephony_platform
- Create enableteams temporarily user : Create a temporarily user to allow creating routing at VoIP:VTX Teams Connect#Create_a_temporarily_user_in_the_.3Cservicenumber.3E.teams.ipvoip.ch_domain
- Create Voice Routing: You will create the Voice Routing within Microsoft Teams platform at VoIP:VTX Teams Connect#Voice_Routing_:_Create_Voice_Routing_to_allow_your_users_to_use_VTX_Trunk
- Assign Numbers: You will assign numbers to your users and start using VTX Teams Connect service at VoIP:VTX Teams Connect#Number_Mapping_:_Assign_numbers_to_Microsoft_accounts
- Test Numbers: Use the VTX xx 566 xx xx test number to validate your setup BEFORE the porting date
- Port Numbers: Once your setup is ready, you will ask VTX to enable the service with your real numbers ( Ported Numbers or VTX Numbers ) in order to connect "Teams" to the "standard" telephony networks. This process allows to migrate your telephony service without interruption.
VTX Teams Connect value added features[edit | edit source]
Here are the lists of features that you can use with Teams with VTX integration
- Microsoft Teams Feature: All features provided directly by Microsoft Teams ( Video conferencing / Screen sharing / File sharing / Chat / Calendar / Auto Attendant / Call Queue / ... )
- User presentation : https://www.microsoft.com/en-us/microsoft-365/microsoft-teams/group-chat-software
- Admin presentation : https://docs.microsoft.com/en-us/microsoftteams/teams-overview
- VTX Value Added feature : Here is a list of complementary value added features provided by VTX
- Telephony Network Connectivity : Bridge your Teams client with a real Telephony number ( Swiss numbers and foreign ones soon )
- Hybrid Environment : You can use both SIP phones and/or Teams client within the same enterprise and share the same dialplans
- CLIP / Number Display : Change the number to be displayed for outgoing calls with your main office number, cf VoIP:VTX Teams Connect#CLIP_:_Number_Display_-_I_wish_to_display_a_different_number_than_my_direct_line_for_my_outgoing_calls
- Special Arrangement : Allow to forward the caller number towards external phones ( i.e redirect call towards your mobile and keep caller number being displayed ), cf VoIP:VTX Teams Connect#Special_Arrangement_:_I_wish_to_keep_the_number_of_the_caller_being_displayed_when_redirecting_call_to_an_external_number
- Backup Number : Setup a backup number usually towards a mobile number in case of problem with the Teams platform not to loose any calls
- Business Phone Fax : VTX provides an optional Business Phone Fax to keep allow you to keep using your Fax machine FR : https://www.vtx.ch/fr/corporate/telephonie/business-phone DE : https://www.vtx.ch/de/corporate/telefonie/business-phone
- VTX Fax : VTX provides also an optional VTX Fax to use mail2fax and fax2mail FR : https://www.vtx.ch/fr/corporate/telephonie/fax/commander and DE : https://www.vtx.ch/de/corporate/telefonie/fax/bestellen
Requirements[edit | edit source]
You will find below all the needed requirements to use VTX Teams Connect Service
- A VTX Teams Connect or TRUNK Teams Connect service
- An IT or Partner that knows how to manage a Teams Service. We do offer the "Direct Routing" gateway to bridge teams and the telephony world, but it is the responsibility of the customer IT or partner to setup Teams Admin Center. VTX Support can help if needed but won't do the Teams setup. A Demo account could help them get up to speed if needed
- A Microsoft 365 domain and accounts with the needed Microsoft licenses ( Microsoft Teams + Microsoft 365 Phone System )
- A Microsoft Windows PC/Server with Powershell app and the needed modules to assign numbers to users ( we are working on an integration in the Kiosk too )
- An Internet Connection + optional Firewall rules
- a PC/macbook/iOS/Android device or a "Yealink Teams Edition" phone ( or a combination of those) per teams user
VTX Teams Connect[edit | edit source]
VTX Teams Connect service allows a smooth and easy integration between Microsoft 365 Teams services and the telephony world ( PSTN ) allowing you to use Microsoft service to pass and receive calls using Desktop (PC/macOS) or Mobile Teams application (Android/iOS) or dedicated Teams Desktop Phones. We are using redundant Microsoft validated SBC (Session Border Controller) from Audiocodes to integrate Microsoft Cloud with VTX Telephony platform, and we did automatize the integration to allow flexibility for our partners and customers. As a consequence, no telephony trunk setup is needed on your side.
- Please order a VTX Teams Connect service using https://www.vtx.ch/fr/corporate/telephonie/teams-connect or https://www.vtx.ch/de/corporate/telefonie/teams-connect
- You will get a Kiosk account VTX Kiosk interface account from which you will be able to manage and setup your service
A Microsoft 365 domain and accounts[edit | edit source]
| The Microsoft bundle "Common Area Phone / Téléphone de partie commune" is the bare minimim license that includes only "Teams" and "Phone System". Please select the Microsoft license bundle based on your needs |
- A Microsoft 365 domain and account : You need to have or order a Microsoft 365 account from https://signup.microsoft.com/
- You need to own your own domain name like yourcompanyname.ch . It is not allowed to create Microsoft 365 domain on "shared" domains like vtxnet.ch , google.com, yahoo.com, .... You can order one from VTX => FR or DE
- Make sure to enable "Skype For Business" on your domain in https://admin.cloud.microsoft/AdminPortal/Home#/Domains to allow autoconfiguration.
- That will include a Microsoft domain for your enterprise like enterprise.onmicrosoft.com ( or your own enterprise internet name if by example you migrated your emails to Microsoft )
- A Microsoft 365 Admin account that will be able to buy and affect licenses to your users ( created during signup and giving you access to https://admin.cloud.microsoft )
- A Microsoft 365 Domain provided by VTX when you subscribe to VTX Teams service like <servicenumber>.teams.ipvoip.ch ( ex: 123456.teams.ipvoip.ch visible in Kiosk )
- To integrate this domain on your account, you can enable it from your Kiosk Interface, cf VoIP:VTX_Teams_Connect#Link_your_.3CSERVICE_NUMBER.3E.teams.ipvoip.ch_Domain_between_Microsoft_and_VTX_Telephony_platform below
- This domain will be used by "VTX Teams" service to bridge Microsoft Teams Cloud with VTX VoIP platform using
- A Microsoft 365 admin account with at least the following right (Usually the one used by partner or IT to create user and assign license. Please use "Show all by category" button to see them)
- Identity / Domain Name Administrator Admin right ( to be able to enable the domain <servicenumber>.teams.ipvoip.ch )
- Identity / User Administrator Admin right ( to be able to create users)
- Identity / License Administrator Admin right (to assign licenses)
- Collaboration / Skype For Business Administrator Admin right
- Collaboration / Teams Administrator Admin right
- Collaboration / Teams communication Administrator Admin right
- Collaboration / Teams communication Support Engineer Admin right
- Collaboration / Teams communication Support Specialist Admin right
- A Microsoft 365 user account enableteams@<servicenumber>.teams.ipvoip.ch ( First Name: "Temp User" / Last Name : "VTX Teams" / Login : enableteams@<servicenumber>.teams.ipvoip.ch / No Admin Right / "Teams" and "Phone System" licenses ). It will be used to enable Teams in <servicenumber>.teams.ipvoip.ch domain and can be deleted once Voice Routing rules have been successfully created
- A Microsoft 365 Phone System license ( Temporarily license to create the routing rules, you can disable the license or use it for another user afterwards )
- The Microsoft Teams App ( Temporarily license to create the routing rules, you can disable the license or use it for another user afterwards )
- For all your users wishing to have a telephone number afterwards, a Microsoft Teams + a Microsoft 365 Phone System license are needed
- A "Microsoft Teams" license: provided by a lot of bundles like "Common Area Phone" or "Microsoft Teams Commercial Cloud" or E1 or E3 or E5 or ... )
- A "Microsoft 365 Phone System" License: provided by "Common Area Phone" or "Microsoft 365 Phone System" or E5 or ... (not included in E1 or E3!)


Microsoft Windows PC/Server with Powershell[edit | edit source]
| Powershell is usually already installed on new version of Windows |
| In the download requirements of MicrosoftTeams or SkypeOnlineConnector powershell module, it is said to require Powershell 5.1 , so if you cope with problem with newer version, please install this one |
- Verify that powershell is installed on your PC VoIP:VTX Teams Connect#Powershell_version
- Install One of the 2 powershell modules : MicrosoftTeams powershell module is now preferred
- (new) MicrosoftTeams Powershell Module VoIP:VTX Teams Connect#MicrosoftTeams_:_Install_the_module
(old) Skype For Business OnlineConnector Powershell module VoIP:VTX Teams Connect#.28old.29_SkypeOnlineConnector_:_Install_the_.22Skype_for_Business_Online.22_Powershell_module
(optional) Firewall Access Rules[edit | edit source]
If your are using a Firewall with Access List restrictions, you can find the details of IP ranges to allow at Network:Firewall:Configuration#Teams_Connect.2FVirtual_Firewall_Rules
(optional) Free License Needed for IVR and Auto-Attendant[edit | edit source]
FIXME : Add link to resource
- For all Resources that can handle Call Queue and Auto Attendant
- A "Microsoft Teams" license ( provided by a lot of bundles like "Common Area Phone" or "Microsoft Teams Commercial Cloud" or E1 or E3 or E5 or ... )
- A "Microsoft 365 Phone System - Virtual User" (Free License) for any resource that will handle a Call Queue or Auto Attendant
Video Training[edit | edit source]
Video Training : VTX Teams - Introduction[edit | edit source]
Video Training : VTX Teams - Requirements[edit | edit source]
Video Training : VTX Teams - Setup Domain in VTX Kiosk[edit | edit source]
Video Training : VTX Teams - Create enableteams temporarily user[edit | edit source]
Video Training : VTX Teams - Create Voice Routing[edit | edit source]
Video Training : VTX Teams - Assign Numbers[edit | edit source]
Video Training : VTX Teams - Test Calls & VTX Value added features[edit | edit source]
Video Training : Microsoft Teams app Usage[edit | edit source]
Microsoft Videos : https://support.microsoft.com/en-us/office/microsoft-teams-video-training-4f108e54-240b-4351-8084-b1089f0d21d7
Video Training : VTX Teams - Assign Number to IVR and Auto Attendant Resources[edit | edit source]
Part1
Part2
VTX Teams Connect Kiosk Management[edit | edit source]
Link your <SERVICE_NUMBER>.teams.ipvoip.ch Domain between Microsoft and VTX Telephony platform[edit | edit source]
- Connect to https://kiosk.vtx.ch/VoIP/ManageTeams.aspx and follow the helper. You will declare the domain provided by VTX and link it to your Microsoft account

Microsoft Teams Management[edit | edit source]
Connect to Microsoft 365 Admin Portal[edit | edit source]
| You can use this interfaces for the Domain Management, User management, License management and Software Management |
- Signup URL : https://signup.microsoft.com/
- Main Admin URL : https://admin.cloud.microsoft/
- Domain Management URL: https://admin.cloud.microsoft/Adminportal/Home#/Domains
- User Management URL: https://admin.cloud.microsoft/Adminportal/Home#/users
- Purchase Services URL: https://admin.cloud.microsoft/adminportal/home?add=sub&adminportal=1#/catalog
Create a temporarily user in the <servicenumber>.teams.ipvoip.ch domain[edit | edit source]
| None of your user will use the <servicenumber>.teams.ipvoip.ch, but as stated in the Requirements above, we need to create a temporarily user in this domain with the Teams + Phone System licenses in order to be able to create the CsOnlineVoiceRoute towards VTX SBC |
- Problematic: We wish to create a enableteams@<servicenumber>.teams.ipvoip.ch to enable Teams connection towards VTX VoIP platform
- Solution: Please follow the procedure below
- Connect to https://admin.cloud.microsoft/Adminportal/Home#/users
- Create a new user enableteams@<servicenumber>.teams.ipvoip.ch ( First Name: "Temp User" / Last Name : "VTX Teams" / Login : enableteams@<servicenumber>.teams.ipvoip.ch / No Admin Right / "Teams" and "Phone System" licenses / No need to remember its password, we won't connect with it).
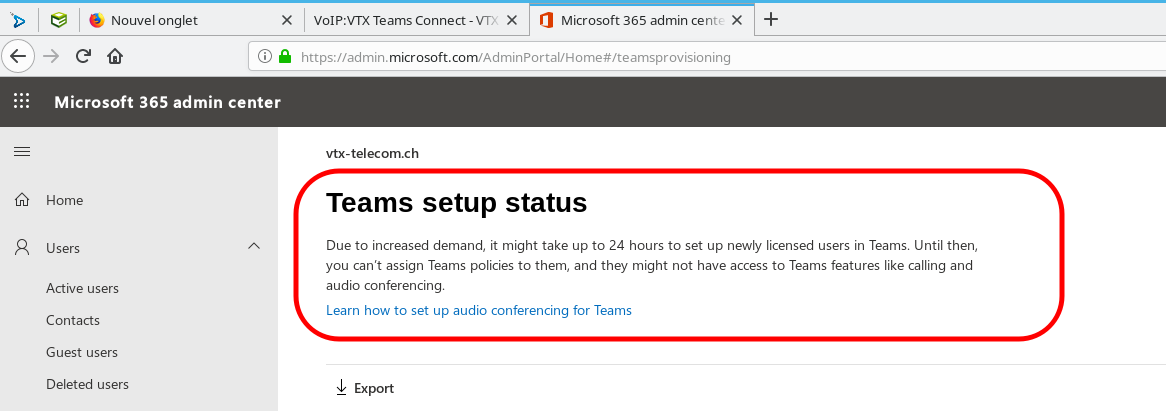
- Wait a few seconds/minutes/hours for Teams to be enabled on this user https://admin.cloud.microsoft/AdminPortal/Home#/teamsprovisioning
- Now even after user is created you night need to wait minutes/hours before being able to create Voice Routing ( especially the New-CsOnlineVoiceRoute ), so if you can please wait 4hours, if not, try to create the routing, if you get error, try again
- Once everything is working ( routing + user mapping + incoming and outgoing calls ), you can delete this user to free up the licenses
Voice Routing : Create Voice Routing to allow your users to use VTX Trunk[edit | edit source]
| You will only need to do voice routing setup once for all users |
| It will take several hours for Microsoft to create your domain after linking it in the Kiosk, so it is wise to wait a few hours before trying to create the routing. If it is not ready, you won't be able to login or Voice Routing will not work. So you will need to be really patient. |
| If the script displays a red error on New-CsOnlineVoiceRoutingPolicy, please read VoIP:VTX Teams Connect#New-CsOnlineVoiceRoutingPolicy_-_Cannot_find_specified_Online_PSTN_usage |
| Once Voice Routing has been correctly created without error, you can delete the user enableteams@<servicenumber>.teams.ipvoip.ch to free up its licenses, it is not needed anymore |
Now you will need to setup a routing plan. You can use one of the following options to do it
- Using a Powershell Script that will ask you questions
- Manually in Powershell
Create Voice Routing using a VTX Powershell Script VTX_Teams_Create_Routing_Rules.ps1[edit | edit source]
| By default for security reason, it is not allowed to execute a powershell script downloaded on the internet, that is why you will need to open them with Wordpad to check what it does, save it and execute it afterwards |
| When you run the script, please look at all red warning errors that are being displayed, and use this wiki to handle any error. You can run the script several time in case of problem, simply discard the "duplicated" errors afterwards. Using the next manual section will help you see where the error comes from |
- Download https://wiki.vtx.ch/media/VTX_Teams_Create_Routing_Rules.ps1 on your computer ( Right Click on the link / Download )
- Open it with Wordpad and use Ctrl-s to save it again ( to inform the system that it is local script )
- Execute it on your PC : It will ask you for these parameters and create the routing
- VTX Teams Domain : ex: 123456.teams.ipvoip.ch
- Your MS Teams Admin Credentials : ex: admin@COMPANY.onmicrosoft.com
Or Create Voice Routing manually in Powershell Command Prompt[edit | edit source]
| If you prefer a manual setup, perform the following actions |
- Open a powershell prompt on your PC
- Copy paste command below one by one changing the values in bold with your own
# Set Variables
$TeamsDomain = "123456.teams.ipvoip.ch"
# Connect to Microsoft Teams management and create all Voice Routing
Connect-MicrosoftTeams
Set-CsOnlinePstnUsage -Identity Global -Usage @{Add="CsOnlinePstnUsage-$TeamsDomain"}
New-CsOnlineVoiceRoute -Identity "CsOnlineVoiceRoute-$TeamsDomain" -Priority 0 -NumberPattern '.*' -OnlinePstnGatewayList "$TeamsDomain" -OnlinePstnUsages "CsOnlinePstnUsage-$TeamsDomain"
New-CsOnlineVoiceRoutingPolicy -Identity "CsOnlineVoiceRoutingPolicy-$TeamsDomain" -OnlinePstnUsages "CsOnlinePstnUsage-$TeamsDomain"
Set-CsCallingLineIdentity -Identity Global -EnableUserOverride $True

# Verify all setup ( You can compare it with the Debug Section in the wiki )
Get-CsOnlinePstnUsage
Get-CsOnlineVoiceRoute
Get-CsOnlineVoiceRoutingPolicy
Get-CsCallingLineIdentity


# Create rule for emergency numbers (10-19, 100-199)
$emergencyRule = New-CsVoiceNormalizationRule -Identity "Global/Emergency Numbers" `
    -Pattern '^(1[0-9]|1[0-9]{2})$' `
    -Translation '$1' `
    -Description "Emergency numbers" `
    -InMemory
# Create rule for short numbers (3xxx, 1xxx, 116xxx, 118xxx)
$shortRule = New-CsVoiceNormalizationRule -Identity "Global/Short Numbers" `
    -Pattern '^(3[0-9]{3}|1[0-9]{3}|11[68][0-9]{3})$' `
    -Translation '$1' `
    -Description "Short numbers" `
    -InMemory
# Add rules to Global Dial Plan
Set-CsTenantDialPlan -Identity "Global" -NormalizationRules @{Add=$emergencyRule,$shortRule}
# Verify rules have been created
Get-CsTenantDialPlan -Identity "Global" | Select-Object Identity, NormalizationRules | Format-List

# Logout
Disconnect-MicrosoftTeams
Dial Plan for Emergency Numbers + Short Numbers + Special Setup[edit | edit source]
- History:
- 2026-01-21: The addition and deletion of Emergency and Short number is directly included in version 4.7+ of the create routing and delete routing script
- Information: By default if you try to dial a number, Teams Client will always try to normalize it in +e164 mode adding your country prefix like +41 or +33 to your number
- Problem: If you call an emergency number like 112 or a Short number like 10XX or 3XXX or 116xxx or ..., it will add an invalid country prefix
- Problematic: Add Dial Plan entries not to alter number dialed
- Symptoms: Within the Teams Client, you will directly see if the number you are typing is being transformed with a county prefix or not. If it is transformed, you are missing the following rules
- Dialplan Documentation: https://docs.microsoft.com/en-US/microsoftteams/create-and-manage-dial-plans
- Dialplan Web Admin Teams Management URL: https://admin.teams.microsoft.com/one-policy/settings/dialplan
- Solution: Use one of the solution
- Run again the create routing script on last version (4.7+) on your domain to create the rules
- Or Connect to Dialplan Web Management interface to add them manually
| Needed for Product Type | Compulsory | Name | Description | If condition | Then do this | Explanation |
|---|---|---|---|---|---|---|
| Teams Connect
Teams Virtual |
Emergency Numbers | Allows to dial Emergency numbers | ^(1[0-9]|1[0-9]{2})$ | $1 | Allows 1x and 1xx Emergency numbers | |
| Teams Connect
Teams Virtual |
Short Numbers | Allows to dial Short numbers | ^(3[0-9]{3}|1[0-9]{3}|11[68][0-9]{3})$ | $1 | Allows 3xxx + 1xxx + 116xxx + 118xxx short numbers | |
| Teams Virtual | optional | Prefix-Star | Allow VTX Feature codes using a "*" prefix | ^(\*\d+(\d|\*|\#)*)$ | $1 | Would allow any code like *<code> |
| Teams Virtual | optional | Prefix-Hash | Allow disabling of VTX Feature codes using a "#" prefix | ^(\#(\d|\*)+)$ | $1 | Would allow any code like #<code> |
| Teams Virtual | optional and to adapt | Short number 84xx | Call colleagues using the 4 last digits of their number | ^(84\d{2})$ | +4122879$1 | Takes a number dialed with 84xx and add "+4122879" in front of it |
| Teams Virtual | optional and to adapt | Group number 2xx | Call VTX VPBX groups | ^(2\d{2})$ | +41228798400$1 | Takes a number dialed with 2xx and add "+41228798400" in front of it |
| Web Admin Interface Dial Plan rule automatically added by the scripts | Support for Short Number and Emergency Numbers integrated in Routing Creation script |
|---|---|

|

Number Mapping : Assign/Unassign numbers to Microsoft accounts[edit | edit source]
Now you will need to assign a number and a routing plan to each user with a "Microsoft 365 Phone System" license. You can use one of the following options to do it
- Using a Powershell Script that will ask you questions
- Manually in Powershell
Assign/Unassign numbers using a VTX Powershell Script VTX_Teams_Assign_Numbers.ps1[edit | edit source]
| By default for security reason, it is not allowed to execute a powershell script downloaded on the internet, that is why you will need to open them with Wordpad to check what it does, save it and execute it afterwards |
- Download https://wiki.vtx.ch/media/VTX_Teams_Assign_Numbers.ps1 on your computer ( Right Click on the link / Download )
- Open it with Wordpad and use Ctrl-s to save it again ( to inform the system that it is local script )
- Execute it on your PC : It will ask you for these parameters and create the routing
- VTX Teams Domain : ex: 123456.teams.ipvoip.ch
- Your MS Admin Credentials for : ex: admin@MSDOMAIN.onmicrosoft.com
- The MS Team user email : ex: first.last@MSDOMAIN.onmicrosoft.com
- The Telephone number you wish to set : ex: +41225661234 / or leave string empty to unassign number from user
Here is a list of screenshots to see how the script works


Or Assign numbers manually in Powershell Command Prompt[edit | edit source]
| If you prefer a manual setup, perform the following actions |
- Open a powershell prompt on your PC
- Copy paste command below one by one changing the values in bold with your own
# Set Variables
$TeamsDomain = "123456.teams.ipvoip.ch"
$TeamsUserEmail = "first.last@MSDOMAIN.onmicrosoft.com"
$TeamsUserNumber = "+41215661234"
# Connect to Microsoft Teams management and assign number and profile to the user
Connect-MicrosoftTeams
# Assign a number to your user and the Call Routing
Set-CsPhoneNumberAssignment -Identity "$TeamsUserEmail" -PhoneNumber "$TeamsUserNumber" -PhoneNumberType DirectRouting
# Assign a Voice Routing Policy to your user to allow it to call out towards external numbers
Grant-CsOnlineVoiceRoutingPolicy -Identity $TeamsUserEmail -PolicyName "CsOnlineVoiceRoutingPolicy-$TeamsDomain"
# Disable voicemail of the user to prevent that it answers all calls if user is not connected
Set-CsOnlineVoicemailUserSettings -Identity $TeamsUserEmail -VoicemailEnabled $false
# Wait 60s for settings to be applied
Sleep -s 60
# Verify Your setup
Get-CsOnlineUser -Identity $TeamsUserEmail | Select EnterpriseVoiceEnabled,OnPremLineURI,OnlineVoiceRoutingPolicy,RegistrarPool | Format-List
# List all users with EnterPrise Voice Enabled
Get-CsOnlineUser ` -Filter {(enterprisevoiceenabled -eq $true)} ` | Select sipaddress,HostedVoicemailPolicy,OnlineVoiceRoutingPolicy,lineuri | Format-List
# Logout
Disconnect-MicrosoftTeams
Or Unassign numbers manually in Powershell Command Prompt[edit | edit source]
| If you prefer a manual setup, perform the following actions |
- Open a powershell prompt on your PC
- Copy paste command below one by one changing the values in bold with your own
# Set Variables
$TeamsDomain = "123456.teams.ipvoip.ch"
$TeamsUserEmail = "first.last@MSDOMAIN.onmicrosoft.com"
$TeamsUserNumber = "+41215661234"
# Connect to Microsoft Teams management and assign or unassign number and profile to the user
Connect-MicrosoftTeams
# Unassign a number to your user and the Call Routing
Remove-CsPhoneNumberAssignment -Identity "$TeamsUserEmail" -PhoneNumber "$TeamsUserNumber" -PhoneNumberType DirectRouting
# Verify Your setup
Get-CsOnlineUser -Identity $TeamsUserEmail | Select EnterpriseVoiceEnabled,OnPremLineURI,OnlineVoiceRoutingPolicy,RegistrarPool | Format-List
# List all users with EnterPrise Voice Enabled
Get-CsOnlineUser ` -Filter {(enterprisevoiceenabled -eq $true)} ` | Select sipaddress,HostedVoicemailPolicy,OnlineVoiceRoutingPolicy,lineuri | Format-List
# Logout
Disconnect-MicrosoftTeams
Resource Management[edit | edit source]
Conference Mode[edit | edit source]

- Information: Microsoft Teams Call Queues support a Conference Mode setting.
This mode reduces the time required to connect calls to agents by using conferencing resources to establish the call.
For Conference Mode to work correctly, agents must meet Microsoft requirements (supported client version, TeamsOnly mode, etc.).
More informations: https://learn.microsoft.com/en-us/microsoftteams/plan-auto-attendant-call-queue
- Problematic: In some environments, Conference Mode may cause incoming call drops and or early call termination
- Solution/Workaround: Disable conference Mode on the Call Queue if such issues occur.
Note:
It is not recommended to disable Conference Mode globally, as other features may rely on it and call delivery performance may be impacted.
Apply only in case of issues or specific scenarios or use for troubleshooting.
Possible impact:
Disabling Conference Mode can change call handling behavior:
- Calls are no longer connected using conferencing resources
- May slightly increase call setup time for agents (up to 8s)
Disable Conference Mode[edit | edit source]
Note: Setting can also be controlled via Teams Voice Applications Policy set
Set-CsTeamsVoiceApplicationsPolicy -AllowCallQueueConferenceModeChange
- When creating a Call Queue, Conference Mode can be enabled (default) or disabled during setup
- If already configured, it can be modified in specific Call Queue settings in "Call handling and routing"
- PowerShell can be used to manage it using the parameter -ConferenceMode $true / $false with Set-CsCallQueue
Example disable Conference Mode:
Set-CsCallQueue -Identity <CallQueueId> -ConferenceMode $false
Create and Manage Call Queues[edit | edit source]
- Problematic: You would like to create a Call Queue that will play some greetings and then ring on several phones in parallel / serial modes
- Solution : Follow procedure below
- Connect to https://admin.teams.microsoft.com/call-queues
- Follow documentation in https://docs.microsoft.com/en-us/microsoftteams/create-a-phone-system-call-queue
- Add a "Microsoft Teams" and "Microsoft 365 Phone System - Virtual User" license to your user
- Assign a number in the corresponding resource in next sections

Create and Manage Auto Attendants[edit | edit source]
- Problematic: You would like to create an auto Attendant that can answer your call, play accouncement, and route calls using Time Conditions (inclusing Holidays) or IVR system
- Solution : Follow procedure below
- Connect to https://admin.teams.microsoft.com/auto-attendants
- Follow documentation in https://docs.microsoft.com/en-us/microsoftteams/create-a-phone-system-auto-attendant
- Add a "Microsoft Teams" and "Microsoft 365 Phone System - Virtual User" license to your user
- Assign a number in the corresponding resource in next sections

Create Resource accounts[edit | edit source]
- Problematic: You would like to create a resource that will be linked to a Call Queue or Auto Attendent and assign it with a Phone Number
- Solution : Follow procedure below
- Connect to https://admin.teams.microsoft.com/company-wide-settings/resource-accounts
- Follow documentation in https://docs.microsoft.com/en-us/microsoftteams/manage-resource-accounts#create-a-resource-account-in-the-microsoft-teams-admin-center


Number Mapping : Assign numbers to Resource accounts[edit | edit source]
Assign Resource numbers using a VTX Powershell Script VTX_Teams_Assign_Numbers.ps1[edit | edit source]
| Since last versions of the MicrosoftTeams module, we can use the same script to assign number and resources |
Please refer to VoIP:VTX Teams Connect#Assign_numbers_using_a_VTX_Powershell_Script_VTX_Teams_Assign_Numbers.ps1
Or Assign Resource numbers manually in Powershell Command Prompt[edit | edit source]
- Open a powershell prompt on your PC
- Copy paste command below one by one changing the values in bold with your own
# Set Variables
$TeamsDomain = "123456.teams.ipvoip.ch"
$TeamsResourceEmail = "resourceX@MSDOMAIN.onmicrosoft.com"
$TeamsResourceNumber = "+41215661234"
# Connect to Microsoft Teams management
Connect-MicrosoftTeams
# Assign a number to your resource
Set-CsPhoneNumberAssignment -Identity "$TeamsResourceEmail" -PhoneNumber "$TeamsResourceNumber" -PhoneNumberType DirectRouting
# Assign a Voice Routing Policy to your resource to allow it to call out towards external numbers
Grant-CsOnlineVoiceRoutingPolicy -Identity $TeamsResourceEmail -PolicyName "CsOnlineVoiceRoutingPolicy-$TeamsDomain"
# Wait 60s for settings to be applied
Sleep -s 60
# Verify Your setup
Get-CsOnlineApplicationInstance -Identity $TeamsResourceEmail
Get-CsOnlineUser -Identity $TeamsResourceEmail | Select sipaddress,EnterpriseVoiceEnabled,OnPremLineURI,OnlineVoiceRoutingPolicy | Format-List
# Logout
DisConnect-MicrosoftTeams
Dismantle the Service[edit | edit source]
Delete Voice Routing[edit | edit source]
Delete Voice Routing using a VTX Powershell Script VTX_Teams_Delete_Routing_Rules.ps1[edit | edit source]
| By default for security reason, it is not allowed to execute a powershell script downloaded on the internet, that is why you will need to open them with Wordpad to check what it does, save it and execute it afterwards |
| To delete the Voice Routing Rule, the script will need to make sure no more user is still using it, and will try to unmap numbers and VoiceRoutingPolicy of users using the MSTeamsDomain that you are dismantling |
- Download https://wiki.vtx.ch/media/VTX_Teams_Delete_Routing_Rules.ps1 on your computer ( Right Click on the link / Download )
- Open it with Wordpad and use Ctrl-s to save it again ( to inform the system that it is local script )
- Execute it on your PC : It will ask you for these parameters and delete the routing
- Your MS Teams Admin Credentials : ex: admin@COMPANY.onmicrosoft.com
- VTX Teams Domain : ex: 123456.teams.ipvoip.ch
- If you have several other Teams trunk on your company, do not execute the last option that would delete the Dial Plan rules

Or Delete Voice Routing manually in Powershell Command Prompt[edit | edit source]
Here are the commands you can use to delete the Voice Routing if you wish to migrate service somewhere else
| You will only be able to delete these entries if no user is using the CsOnlineVoiceRoutingPolicy |
- Open a powershell prompt on your PC
- Copy paste command below one by one changing the values in bold with your own
# Set Variables
$TeamsDomain = "123456.teams.ipvoip.ch"
# Connect to Microsoft Teams management
Connect-MicrosoftTeams

# Delete the Voice Routing
Remove-CsOnlineVoiceRoute -Identity "CsOnlineVoiceRoute-$TeamsDomain"
Remove-CsOnlineVoiceRoutingPolicy -Identity "CsOnlineVoiceRoutingPolicy-$TeamsDomain"
Set-CsOnlinePstnUsage -Identity Global -Usage @{Remove="CsOnlinePstnUsage-$TeamsDomain"}
# Delete Voice Dial Plan. Only do this if they are not used by another domain
Set-CsTenantDialPlan -Identity "Global" -NormalizationRules @()

# Logout
Disconnect-MicrosoftTeams
Powershell Management[edit | edit source]
Powershell version[edit | edit source]
| Powershell 7 is known to have problem with MicrosoftTeams module, please prefer to use embedded Powershell version 5.1 by default, cf https://docs.microsoft.com/en-us/microsoftteams/teams-powershell-install |
What is my Powershell version ?[edit | edit source]
- Problematic: You would like to know which powershell version you are using
- Solution: Start a Powershell shell and type the command "$PSVersionTable.PSVersion"
PS H:\> $PSVersionTable.PSVersion
Major  Minor  Build  Revision
-----  -----  -----  --------
5      1      19041  610
Install Powershell[edit | edit source]
| Powershell 7 is known to have problem with MicrosoftTeams module, please prefer to use embedded Powershell version 5.1 by default, cf https://docs.microsoft.com/en-us/microsoftteams/teams-powershell-install |
- Problematic: When you use your start menu, you do not find powershell, so you would like to install it
- Solution: Download and Install Powershell on your PC https://docs.microsoft.com/en-us/powershell/scripting/install/installing-windows-powershell
Powershell Module Management[edit | edit source]
MicrosoftTeams Module[edit | edit source]
| This new powershell module MicrosoftTeams is known to have problem with Powershell version 7, please use OS embedded version 5.1 ! |
- Information: Microsoft is slowly replacing Skype for Business Online Powershell module with a new one MicrosoftTeams. This new module includes the same connection modules with some additional commands dedicated for Teams. https://docs.microsoft.com/en-us/microsoftteams/teams-powershell-install
MicrosoftTeams : Install the module[edit | edit source]
| Do not use Powershell version 7, use embedded version 5.1 |
- Problematic: You would like to install the MicrosoftTeams powershell module
- Additional Information : please refer to https://docs.microsoft.com/en-us/microsoftteams/teams-powershell-install
- Solution: Follow the procedure below
- (optional) Uninstall the old SkypeOnlineConnector Powershell module in VoIP:VTX Teams Connect#.28old.29_SkypeOnlineConnector_:_Uninstall_the_module
- Open Start menu and search "powershell" ( click the small Arrow to open it in Administrator mode ) Make sure to run the embedded version
- Use the powershell commands below to install the module "Install-Module MicrosoftTeams -RequiredVersion 4.5.0" (later version might work, but we validated this one)
- Accept to install the module from Powershell PSRepository
Install the MicrosoftTeams 4.5.0 version
PS H:\> Install-Module MicrosoftTeams -RequiredVersion 4.5.0

Untrusted repository
You are installing the modules from an untrusted repository. If you trust this repository, change its
InstallationPolicy value by running the Set-PSRepository cmdlet. Are you sure you want to install the modules from
'PSGallery'?
[Y] Yes  [A] Yes to All  [N] No  [L] No to All  [S] Suspend  [?] Help (default is "N"): Y


PS H:\> Get-Module -ListAvailable MicrosoftTeams
    Directory: H:\WindowsPowerShell\Modules
ModuleType Version    Name                                ExportedCommands
---------- -------    ----                                ----------------
Script     4.5.0      MicrosoftTeams                      {Add-TeamChannelUser, Add-TeamUser, Connect-MicrosoftTeams...


| If you are not a local administrator, Microsoft Teams PowerShell module can be installed for the user profile only by using -Scope CurrentUser |
MicrosoftTeams : What is the installed version of the module[edit | edit source]
- Problematic : You would like to know which version of MicrosoftTeams you are running
- Solution: Use the command below "Get-Module -ListAvailable MicrosoftTeams"
- Additional Information: You can verify the changelog of the version in https://docs.microsoft.com/en-us/microsoftteams/teams-powershell-release-notes
Normal output if you have install the version 4.5.0
PS H:\> Get-Module -ListAvailable MicrosoftTeams


    Directory: C:\Program Files\WindowsPowerShell\Modules


ModuleType Version    Name                                ExportedCommands
---------- -------    ----                                ----------------
Script     4.5.0      MicrosoftTeams                      {Add-TeamChannelUser, Add-TeamUser, Connect-MicrosoftTeams...
Here is the output if you have 2 versions installed, you can use next section to delete the one you wish to remove
PS C:\WINDOWS\system32> Get-Module -ListAvailable MicrosoftTeams


    Directory: C:\Program Files\WindowsPowerShell\Modules


ModuleType Version    Name                                ExportedCommands
---------- -------    ----                                ----------------
Script     4.5.0      MicrosoftTeams                      {Add-TeamChannelUser, Add-TeamUser, Connect-MicrosoftTeams...
Binary     2.0.0      MicrosoftTeams                      {Add-TeamUser, Connect-MicrosoftTeams, Disconnect-Microsof...
MicrosoftTeams : Update the module to last version[edit | edit source]
- Problematic: You have see that there is a new powershell MicrosoftTeams module in https://docs.microsoft.com/en-us/microsoftteams/teams-powershell-release-notes and you would like to install it
- Solution: Follow the procedure below
- Open Start menu and search "powershell" ( click the small Arrow to open it in Administrator mode ) Make sure to run the embedded version
- Use the powershell commands below to remove the module "Update-Module MicrosoftTeams"
PS C:\WINDOWS\system32> Update-Module MicrosoftTeams
MicrosoftTeams : Uninstall the module[edit | edit source]
- Problematic: You would like to uninstall the MicrosoftTeams powershell module
- Additional Information : please refer to https://docs.microsoft.com/en-us/microsoftteams/teams-powershell-install
- Solution: Follow the procedure below
- Open Start menu and search "powershell" ( click the small Arrow to open it in Administrator mode ) Make sure to run the embedded version
- Use the powershell commands below to remove the module "Uninstall-Module MicrosoftTeams"
Uninstall all versions of the module
PS C:\WINDOWS\system32> Uninstall-Module MicrosoftTeams
Powershell VTX Script Management[edit | edit source]
Update all VTX Powershell scripts to last version[edit | edit source]
| Before using any of the script, we advise you to simply run the script "VTX_Teams_Update_All_Scripts.ps1" to make sure to run last version |
- Problematic: You would like to get the last version of all VTX Teams scripts
- Solution: Simply follow the steps below
- Create a folder on your PC like "VTX Teams Scripts"
- Download https://wiki.vtx.ch/media/VTX_Teams_Update_All_Scripts.ps1 and put it in this folder ( Righ Click on the link and download the target file )
- Execute VTX_Teams_Update_All_Scripts.ps1 in powershell ( right click on the script and select "Run with Powershell"
- In case of problem, you can use the table below to download each file one by one
| Usage | Script Name | Link |
|---|---|---|
| Download or update all scripts | VTX_Teams_Update_All_Scripts.ps1 | wget https://wiki.vtx.ch/media/VTX_Teams_Update_All_Scripts.ps1 |
| Create VTX Teams Direct Routing
to be used only ones at 1st setup |
VTX_Teams_Create_Routing_Rules.ps1 | wget https://wiki.vtx.ch/media/VTX_Teams_Create_Routing_Rules.ps1 |
| Assign or Remove numbers to users | VTX_Teams_Assign_Numbers.ps1 | wget https://wiki.vtx.ch/media/VTX_Teams_Assign_Numbers.ps1 |
not needed anymore, please use VTX_Teams_Assign_Numbers.ps1 |
||
| Unmap numbers for all users and resources
then, delete routing |
VTX_Teams_Delete_Routing_Rules.ps1 | wget https://wiki.vtx.ch/media/VTX_Teams_Delete_Routing_Rules.ps1 |


Debug[edit | edit source]
| We remind you that for the time being, each actions takes several hours to be in production, so you need to be really patient and follow the steps above one by one |
Start powershell script in Command Line to be able to see the errors[edit | edit source]
- Problem: If you enter wrong credentials, or wrong domain, or if the domain or user is not yet ready on Microsoft side, you might get an error that disappears too quickly
- Solution: use the powershell -File file.ps1 command to be able to see the errors
- Start a "cmd" ( Start menu and enter "cmd" + Enter to display the Black Window
- Use the command powershell -File file.ps1 ( replacing file.ps1 with the correct path of the ps1 file )
Microsoft Windows [Version 6.3.9600]
(c) 2013 Microsoft Corporation. All rights reserved.

H:\>c:

C:\>powershell -File "C:Users\bob\Desktop\VTX_Connect_Teams_Create_Routing_Rules
.ps1"
VTX Teams Connect domain name is XXXX.teams.ipvoip.ch
VTX Teams Admin Username is vtxadmin@XXXX.teams.ipvoip.ch
Connecting to Microsoft Online Management with the credentials you provided
Get-CsOnlinePowerShellEndpoint : The remote name could not be resolved:
'lyncdiscover.xxxx.teams.ipvoip.ch'
At C:\Program Files\Common Files\Skype for Business
Online\Modules\SkypeOnlineConnector\SkypeOnlineConnectorStartup.psm1:149
char:26
+ ... targetUri = Get-CsOnlinePowerShellEndpoint -TargetDomain $adminDomain ...
+                 ~~~~~~~~~~~~~~~~~~~~~~~~~~~~~~~~~~~~~~~~~~~~~~~~~~~~~~~~~
    + CategoryInfo          : NotSpecified: (:) [Get-CsOnlinePowerShellEndpoin
   t], WebException
    + FullyQualifiedErrorId : System.Net.WebException,Microsoft.Rtc.Management
   .OnlineConnector.GetPowerShellEndpointCmdlet


C:\>powershell -File "C:Users\bob\Desktop\VTX_Connect_Teams_Create_Routing_Rules
.ps1"
Verify Voice Routing[edit | edit source]
To verify Voice Routing, you can either use Powershell command lines or check from Admin Teams Web interface in the following 2 sections
Verify Voice Routing using Powershell[edit | edit source]
PS H:\> Get-CsOnlinePstnUsage
Identity : Global
Usage    : {CsOnlinePstnUsage-123456.teams.ipvoip.ch}
PS H:\> Get-CsOnlineVoiceRoute

Identity              : CsOnlineVoiceRoute-123456.teams.ipvoip.ch
Priority              : 0
Description           :
NumberPattern         : .*
OnlinePstnUsages      : {CsOnlinePstnUsage-123456.teams.ipvoip.ch}
OnlinePstnGatewayList : {123456.teams.ipvoip.ch}
Name                  : CsOnlineVoiceRoute-123456.teams.ipvoip.ch
PS H:\> Get-CsOnlineVoiceRoutingPolicy

Identity         : Global
OnlinePstnUsages : {}
Description      :
RouteType        : BYOT

Identity         : Tag:CsOnlineVoiceRoutingPolicy-123456.teams.ipvoip.ch
OnlinePstnUsages : {CsOnlinePstnUsage-123456.teams.ipvoip.ch}
Description      :
RouteType        : BYOT
PS H:\> Get-CsCallingLineIdentity

Identity                  : Global
Description               :
EnableUserOverride        : True
ServiceNumber             :
CallingIDSubstitute       : LineUri
BlockIncomingPstnCallerID : False
Verify Voice Routing using Teams Admin Web Interface[edit | edit source]
- Verify Voice Routing Rule
- Connect to https://admin.teams.microsoft.com/direct-routing/v2/voice-routes and verify the routing rule (cf screenshot)
- Verify Voice Routing Policy
- Connect to https://admin.teams.microsoft.com/policies/teamsonlinevoicerouting and verify Voice Routing policy (cf screenshot )
- Name should be CsOnlineVoiceRoutingPolicy-<service_nummber>.teams.ipvoip.ch
- PSTN Usage Record should be CsOnlinePstnUsage-<service_nummber>.teams.ipvoip.ch


Verify User Setup[edit | edit source]
To verify User setup, you can either use Powershell command lines or check from Admin Teams Web interface in the following 2 sections
Verify User setup using Powershell[edit | edit source]
| You can use these powershell commands too verify all your users do have a valid MS Teams license enabled ( that enables EnterpriseVoiceEnabled ) and also have the correct OnlineVoiceRoutingPolicy |
 # Set Variables
 $TeamsDomain = "123456.teams.ipvoip.ch"

 # Connect to Microsoft Teams management and assign number and profile to the user
 Connect-MicrosoftTeams
 # Verify all users with correct setup using CsOnlineVoiceRoutingPolicy-$TeamsDomain
 Get-CsOnlineUser | Where-Object {($_.enterprisevoiceenabled -eq $true) -and ($_.OnlineVoiceRoutingPolicy -Match "^CsOnlineVoiceRoutingPolicy-$TeamsDomain$") } | Select sipaddress,InterpretedUserType,HostedVoicemailPolicy,OnlineVoiceRoutingPolicy,LineUri | Format-List

 SipAddress               : sip:bob.razovski@vtx-telecom.ch
 InterpretedUserType      : HybridOnlineTeamsOnlyUser
 HostedVoicemailPolicy    :
 OnlineVoiceRoutingPolicy : CsOnlineVoiceRoutingPolicy-123456.teams.ipvoip.ch
 LineUri                  : tel:+41215661234

 SipAddress               : sip:hello.man@vtx-telecom.ch
 InterpretedUserType      : HybridOnlineTeamsOnlyUser
 HostedVoicemailPolicy    :
 OnlineVoiceRoutingPolicy : CsOnlineVoiceRoutingPolicy-123456.teams.ipvoip.ch
 LineUri                  : tel:+41215661235
Verify User setup using Teams Admin Web Interface[edit | edit source]
- Verify user licenses
- Connect to https://admin.cloud.microsoft/AdminPortal/Home#/users and verify that your user does have a "Microsoft Teams" license and a "Microsoft 365 Phone System" license
- Verify in https://admin.cloud.microsoft/AdminPortal/Home#/teamsprovisioning that your user Teams license provisioning is finished ( it can take several hours )
- Verify user number
- Connect to https://admin.teams.microsoft.com/users and verify that "Phone Number" has been correctly setup via powershell
- Verify user routing rules
- Connect to https://admin.teams.microsoft.com/user and select your user
- Go in the Policies tab section and look at the last entry "Voice routing policy", is should be CsOnlineVoiceRoutingPolicy-<service_number>.teams.ipvoip.ch


Verify number provisioning in MS Teams app[edit | edit source]
| It might take some hours ( up to 4h in our tests) to be able to see your number in the Teams app even if you see the number in Teams Admin web interface. You can try to restart the app to speed it up |
- Verify the number on the MS Teams app
- Open the MS Teams app
- Go in the Calls section ( if you do not see it, then the "Phone System" license is not correctly set )
- (Mobile) You might get a popup informing that you have a new license and that app needs to be restarted
- (PC) Restart is not supposed to be needed, if you have waited a long time, please try to exit the app and start it back
- Verify that you can see the phone number in the Call section and that you can pass incoming and outgoing calls

FAQ[edit | edit source]
General Questions[edit | edit source]
Where can I find Microsoft Teams Admin and End User trainings ?[edit | edit source]
- Information: On the VTX wiki, you will find documentation and tips regarding MS Teams Direct Training connectivity towards VTX Telephony Platform, but not related to Teams Global Training
- Solution: To get access to Microsoft Teams training, please refer the links below
- Admin trainings for Teams : https://docs.microsoft.com/en-US/microsoftteams/itadmin-readiness
- End User trainings for Teams : https://support.office.com/article/microsoft-teams-video-training-4f108e54-240b-4351-8084-b1089f0d21d7
What are the differences between a "Teams Connect" and a "Teams Virtual" ?[edit | edit source]
| Teams Connect | Teams Virtual | |
|---|---|---|
| Short Description | VTX handles "only" the connection between Teams Cloud and the Telephony Network allowing you to operates real phone numbers on your Teams Client | Teams Virtual allows an hybrid environment with SIP Phones and Teams Phones
The Intelligence remains handled in the VTX Kiosk |
| Analogy | Like a VTX ConnectPBX product but to be used only with Teams Cloud ( preconfigured for Teams by VTX with a lot of automation ) | a VTX VPBX service allowing you to use MS Teams client in parallel of normal SIP phones |
| VTX Service and Licenses Needed | a "Teams Connect" ( billed per number of concurrent calls + number of numbers )
N/A per user |
a VPBX Service ( billed per number of numbers )
a "Teams Virtual" license per user |
| Microsoft Licenses Needed | Microsoft Teams per user
Microsoft Phone System per user |
Microsoft Teams per user
Microsoft Phone System per user |
| Pros | - Simple and Basic solution from VTX to add real numbers to your Teams accounts
- "Cheap" solution to use Microsoft Teams |
- Allows an hybrid solution if you do not wish to have all your users and landing Zone to
use Microsoft Licenses. - You can use a mix of simple SIP phones ( Gigaset, Snom, Yealink,... ), VTX Softphones (DeskopControl / MobileControl), Teams Softphones and Yealink Teams phones within the same user or on different users - Allows to handle all Time Conditions and IVR and Groups within VTX Kiosk |
| Cons | - Management of all intelligence in Teams Admin in less sexy than in the VTX Kiosk |
Keep my @company.ch domain : Can I use VTX Teams service with my own Teams domain @company.ch ?[edit | edit source]
| There is no need for you to change the domain of your users with a @xxxx.teams.ipvoip.ch VTX domain, your Teams users will stay with @company.ch domain |
- Problematic: You do own a Microsoft Teams domain like company.ch and you would like to integrate the accounts you have within a "VTX Teams Connect" or "VTX Teams Virtual"
- Information:
- When subscribing to a VTX Teams service, VTX will provide you with a teams domain like xxxx.teams.ipvoip.ch . This domain will be used to bridge your own Teams accounts ending with "@company.ch" with the VTX service. You will never need to force this domain for your end user
- During the VTX Teams service setup, you will be asked to create one temporarily user with the @xxxx.teams.ipvoip.ch domain, but only one, and you can delete it as soon as service is running
- The scrips provided by VTX will allow you to assign numbers to your @company.ch Teams users
- Conclusion: Yes, you can use your own Teams domain @company.ch with VTX Teams service, no need to change your users domain
Multi-Provider : Can I use VTX Teams service in parallel of other provider services ?[edit | edit source]
- Problematic: You do already have another provider that handles the telephony Direct trunking and you wish to also integrate a VTX Teams service
- Information: VTX does provide a unique teams domain per service and also create unique Call Routing rules including this unique ID
- Conclusion: Yes, it is possible to setup a VTX Teams service in parallel of an existing service from another provider. You will select which number is handled by which provider.
Migration[edit | edit source]
How to use Teams in parallel of my existing PBX ?[edit | edit source]
- Problematic: You have some of users within a VTX "Connect PABX" that wish to use Teams ( keeping their number )
- Information: Teams can be completely embedded within a VTX VPBX with the VTX Teams Virtual service. For PBX, integration is different.
- Solution: There are 2 possible solutions
Solution 1: Move some numbers to Teams
- (VTX) Subscribe to a VTX Teams Virtual or VTX Teams Connect depending on your needs
- (Teams) Prepare your user in Teams with the desired number
- (VTX) Ask VTX to move the number from the PBX to Teams
- (PBX setup) Remove the number from PBX setup
- (PBX setup) Redirect internal number to full number. So if an internal user calls the short number or the full number of the colleague, it will go out from the PBX->VTX->Teams
Solution 2: Use Teams in parallel of existing phones behind the PBX: Incoming calls ringing on PBX + Teams, outgoing calls possible from PBX + Teams
- (VTX) Subscribe to a VTX Teams Virtual or VTX Teams Connect depending on your needs
- (Teams) Prepare your user in Teams with another VTX number ( new number provided by VTX that won't be shown when calling out )
- (Teams) Follow FAQ:Teams#CLIP_:_Number_Display_-_I_wish_to_display_a_different_number_than_my_direct_line_for_my_outgoing_calls to have this Teams account displaying the PBX number
- (PBX setup) Setup the PBX to have a parallel ringing between the user account on the PBX and the VTX Teams account
License Management[edit | edit source]
[edit | edit source]
- Symptoms: You are using a "Teams Shared Devices" license and are trying to connect to Teams v2 Client and you get an error "You don't have the required permissions to access this org"
- Explanation: The "Teams Shared Devices" is now not working anymore on Desktop and Web Client
- Solution: Either upgrade to a more expensive license or only use the Mobile Client
- Additional Information: https://learn.microsoft.com/en-us/microsoftteams/teams-add-on-licensing/teams-shared-device-license
Features[edit | edit source]
[edit | edit source]
The idea of this wiki is not to document how Teams App is working, but this Microsoft is doing a great job. So if you have questions about specific features in Teams ( not related to VTX), please have a look at their documentation
- Ex: Teams Video Training : https://support.microsoft.com/en-us/office/microsoft-teams-video-training-4f108e54-240b-4351-8084-b1089f0d21d7
- Other solution : https://letmegooglethat.com/?q=microsoft+teams+app+write+your+question+here
Teams GAB (Global Address Book) Directory Missing[edit | edit source]
- Status: As incredible as it sounds, It doesn't seems possible to enable a Global Address Book directory for several Teams users
- Actions: We have tried it and with Ops Team and even with an Azure Active Directory Premium license, it is not possible to create a global directory
- Information
- The feature request for a GAB ( Global Address Book ) was visible in E365 Roadmap in 2020 but was deleted afterwards
- With a Team Virtual, it would be possible to have incoming call reverse lookup ( and only incoming call reverse lookup ) ! But not with a Connect Teams, info added in VoIP:VTX_Teams_Virtual#VTX_Teams_Virtual_value_added_features
- Some external paying tools seems to allow to sync an external directory with each individual Teams Directory, but it gets tricky
- References:
- Conclusion:
- VTX is not responsible for the lack of this missing features in Teams, and indeed this one doesn't seem to be possible
- Some tweaks might be possible with full Office 365 integration but we haven't tested it
[edit | edit source]
- Information: Microsoft Teams allows to delegate management of incoming and/or outgoing calls allowing a colleague/secretary to handle your calls, cf https://support.microsoft.com/en-us/office/share-a-phone-line-with-a-delegate-16307929-a51f-43fc-8323-3b1bf115e5a8
- Problematic: You would like to use this feature
- Solution: Follow one of the solution below depending on your service
- For "Teams Connect" users, you can already use this feature, it is allowed on VTX side, cf https://support.microsoft.com/en-us/office/share-a-phone-line-with-a-delegate-16307929-a51f-43fc-8323-3b1bf115e5a8
- for "Teams Virtual" users, you can also use this feature ( it was enabled in January 2025 "VTX reference Redmine #93076" )
Use Teams to follow "tel:" or "callto:" URL[edit | edit source]
- Information: Once you have selected a default app to perform outgoing call, you will need to manually change it to use another Application to handle the tel: uri
- Problematic: You wish to setup your PC to use Teams app for tel: and callto: URLs to directly call numbers from web browsers
- Solution ( Windows 10 ) : Change the default app for tel uri
- Click on the link below to verify id your system is already setup to use Teams for tel: and callto: URLs, if not continue to follow the steps
- Go in Control Panel / Programs / Default Programs and click the "Set your default programs"
- Go in the bottom of the menu to "Set Defaults by app" and click on Teams
- Click the "Choose a default" and select Teams / Manage
- For URL:callto and URL:tel select "Teams"
- Example: You can use the links below to perform tests
- +41225117902 : VTX Echo test number without any link except if your browser is able to detect this as a number
- tel:+41225117902: VTX Echo test number with tel: URI syntax
- callto:+41225117902: VTX Echo test number with callto: URI syntax


Frequent Errors[edit | edit source]
New-CsOnlineVoiceRoutingPolicy - Cannot find specified Online PSTN usage[edit | edit source]
- Problem: When we run the script to create the call routing, you might get a red error that New-CsOnlineVoiceRoutingPolicy is not working
- Symptoms: When running the script to create the call routing, you might get an error "Cannot find specified Online PSTN usage"
- Possible Explanation:
- You forgot to create the temporary User "enableteams"
- MS Teams platform is getting some delay and between the time we create the Online PSTN usage and the time we use it in Online Voice Routing Policy, we need to wait for Teams platform to get up to date
- Solution:
- Verify that you did create the "enableteam" user, cf VoIP:VTX Teams Connect#Create_a_temporarily_user_in_the_.3Cservicenumber.3E.teams.ipvoip.ch_domain
- Wait up to 4h and try again to use the script again
As you can see after some time, the same command did work

Cannot Import Module SkypeOnlineConnector[edit | edit source]
- Information: By default, it is not allowed to execute powershell scrip on a Windows PC, you need to explicitly allow it
- Problem: If you did not follow the Microsoft documentation while installing the SkypeOnlineConnector module, you will not be able to import it
- Symptoms: You will get the powershell error below
- Solution: Open a powershell prompt as admin and set "Set-ExecutionPolicy RemoteSigned -Force" ( cf below )
- Additional Information: cf https://docs.microsoft.com/en-us/SkypeForBusiness/set-up-your-computer-for-windows-powershell/download-and-install-windows-powershell-5-1
Confirmation of the problem, here Execution Policy is Restricted, i.e disabled
Get-ExecutionPolicy
Restricted
Solution
Set-ExecutionPolicy RemoteSigned -Force

Get-ExecutionPolicy
RemoteSigned
Error that you are getting
Modules d'importation : Le fichier "C:\Program Files\Common Files\Skype for Business
Online\Modules\SkypeOnlineConnectorSkypeOnlineConnectorStartup.psm1" ne peut pas être chargé, car l'exécution de
Les scripts sont désactivés sur ce système. Pour plus d'informations, voir "about_Execution_Policies".
(https:/go.microsoft.com/fwlink/?LinkID=135170).
En ligne:1 Caractère:1
+ modules d'importation "C:\Program Files\Common Files\Skype for Business Onlin ...


+ CategoryInfo : Erreur de sécurité : ( 🙂 [Modules d'importation], PSSecurityException
+ FullyQualifiedErrorId : UnauthorizedAccess,Microsoft.PowerShell.Commands.ImportModuleCommand
Get-CsOnlinePowerShellEndpoint : The remote name could not be resolved: 'lyncdiscover.xxx'[edit | edit source]
- Problem : You get an red colored error when using the scripts
- Symptoms: When starting to use a powershell script or command, you get an error like Get-CsOnlinePowerShellEndpoint : The remote name could not be resolved: 'lyncdiscover.xxx'
- Possible Explanation: You are using an admin account where needed lyncdiscover.$DOMAIN DNS entry is not set correctly
- Solution: You need to create the needed DNS entries on your main domain enabling the "Skype For Business" DNS check on your main domain in https://admin.cloud.microsoft/AdminPortal/Home#/Domains
- Workaround : Add the suffix "-OverrideAdminDomain $TeamsDomain" to the New-CsOnlineSession command


AD Sync Problem[edit | edit source]
What are the numbers defined and used in Teams ?[edit | edit source]
- Information: Teams is using the LineURI and OnPremLineURI parameters to define the number to be used by Teams ( cf below )
- Problem: If you do have an AD sync with Azure Cloud that is overwriting these parameter, Teams telephony calls towards external numbers will stop working
- Symptoms: You are getting a "404 Not found" error on incoming calls
- Solution: Please follow the procedure below
- Use VoIP:VTX Teams Connect#Verify_User_Setup to verify that number currently set for the Teams user
- Make sure your AD sync is not overwritten these fields or make sure it does set the same numbers
- Re-assign the number in Teams using VoIP:VTX Teams Connect#Number_Mapping_:_Assign_numbers_to_Microsoft_accounts
Output of a Teams user listing all fields that contains a Switzerland number
# Set Variables
$TeamsUserEmail = "first.last@MSDOMAIN.onmicrosoft.com"
# Connect to Microsoft Teams management
Connect-MicrosoftTeams
# Get the numbers used by a user
Get-CsOnlineUser -Identity $TeamsUserEmail | Out-String -Stream | Select-String -Pattern "41\d{9}"
OnPremLineURI                        : tel:+412156600xx
                                         <tollNumber>41434307500</tollNumber>
LineURI                              : tel:+412156600xx
# Logout
Disconnect-MicrosoftTeams
'OriginalRegistrarPool' with identity 'xxx' assigned to 'sip:first.last@MSDOMAIN.onmicrosoft.com' has been removed from configuration store[edit | edit source]
- Symptoms: When assigning a number to your user, you set this error """OriginalRegistrarPool' with identity 'xxx' assigned to 'sip:first.last@MSDOMAIN.onmicrosoft.com' has been removed from configuration store"""
- Information: When you are assigning a Teams number to a user, it might cleanup some old parameters used by old Lync setup like the OriginalRegistrarPool. This is normal and only a WARNING, not a ERROR
- Solution : Please follow the procedure below
- Use [[VoIP:VTX Teams Connect#Verify_User_Setup] to verify that number has been correctly setup for your user
- Use the command "Get-CsOnlineUser -Identity $TeamsUserEmail" to get the full details output of the user you are debugging and look at the "TeamsUpgrade" and "RegistrarPool" outputs
- Search your error on Teams Forum
- If needed, get help from VTX
PS H:\> Get-CsOnlineUser -Identity $TeamsUserEmail | Out-String -Stream | Select-String -Pattern "TeamsUpgrade"
TeamsUpgradeEffectiveMode            : TeamsOnly
TeamsUpgradeNotificationsEnabled     : False
TeamsUpgradePolicyIsReadOnly         : ModeAndNotifications
TeamsUpgradePolicy                   :
TeamsUpgradeOverridePolicy           :
PS H:\> Get-CsOnlineUser -Identity $TeamsUserEmail | Out-String -Stream | Select-String -Pattern "RegistrarPool"
TargetRegistrarPool                  :
RegistrarPool                        : sippoolAM48976.infra.lync.com
Incoming Call Problem[edit | edit source]
403 Forbidden : License Problem / User is not Enterprise Voice enabled[edit | edit source]
- History:
- 2023-08: We had a nice problem where setup was not working because only some "Microsoft Teams Shared Devices" licenses were setup and not a single "Phone System". It was blocking setup of resources. In this case, please order one real "Phone System License" (@VTX: cf example t1990043)
- Symptoms: You are calling a Teams number and you get a 403 error all the time from Teams
- Solution: Use VoIP:VTX Teams Connect#Verify_User_Setup to verify that your user is setup correctly and enable back the correct license

SIP/2.0 403 Forbidden
...
CSeq: 1 INVITE
ALLOW: INVITE,ACK,OPTIONS,CANCEL,BYE,NOTIFY
Server: Microsoft.PSTNHub.SIPProxy v.2020.11.29.1 i.EUWE.3
Reason: Q.850 ;cause=63 ;text="...;User is not Enterprise Voice enabled."
404 Not found : Number hasn't been assigned[edit | edit source]
- Problem: You cannot call a Microsoft Teams number
- Status: You have assigned a number to a "Microsoft Teams Virtual" in the Kiosk Hardware Module or the number belongs to a "Teams Connect", but incoming call towards this number are not working and are rejected.
- Symptoms: When calling the number, you get a "404 Not Found" Number hasn't been assigned error
- History:
- 2023-10: Setting up extension from routing can trigger problem, do not setup numbers like "+14025557334;ext=334", cf https://www.google.com/search?q=MC487014
- Check to perform 1:
- (VoIP Analyzer for VTX Partners) Using VoIP Analyser, check the status of the number and verify that call was rejected by Microsoft Proxy with a 404 error
- (Teams Domain) Verify in https://admin.cloud.microsoft/AdminPortal/Home#/Domains that you did enable the <service_number>.teams.ipvoip.ch domain for MS Teams
- (Teams + Phone System) Verify in https://admin.cloud.microsoft/AdminPortal/Home#/users that you did enable Teams + Phone System to your user
- (Number) Verify in https://admin.teams.microsoft.com/users that you did assign the correct Phone number to your user

[edit | edit source]
- Symptoms: You are calling a Teams number , call is ringing for 20s then call is cut with a 480 error
- Possible Explanation: You have a 20s redirection setup on the Teams client towards nothing
- Solution: Please read VoIP:VTX Teams Connect#Disable_Call_redirection_to_Voicemail section below

SIP/2.0 480 Temporarily Unavailable
...
CSeq: 1 INVITE
ALLOW: INVITE,ACK,OPTIONS,CANCEL,BYE,NOTIFY
SERVER: Microsoft.PSTNHub.SIPProxy v.2020.11.29.1 i.EUWE.3
Reason: Q.850 ;cause=31 ;text="...;Could not obtain destination from voicemail workflow."
Calls answered by voicemail all the time[edit | edit source]
| If you redirect call to a Teams user that is not connected, all calls will be answered anyway by a voicemail ! By default all Teams users do have a redirection towards their voicemail. |
- Symptoms: All calls towards a number are answered by a voicemail
- Example: You have 3 users within a VPBX group and one of them is not connected ( PC shutdown ), all calls will be answered by his voicemail
- Solution: Please read VoIP:VTX Teams Connect#Disable_Call_redirection_to_Voicemail section below
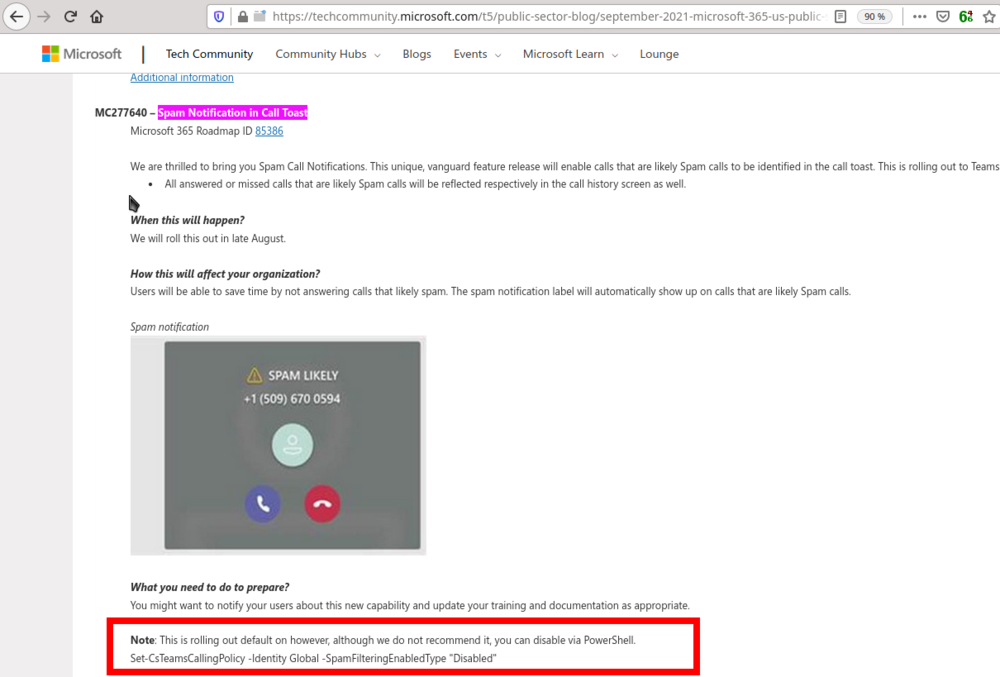
Spam Call Blocking - Caller being asked : "Please press XX to connect the call"[edit | edit source]
- Symptoms: Some incoming calls towards your Teams number are being requested to press 2 digits to connect the call
- Explanation: When you receive a call from someone that is changing its number to a service number like a 058.. or a 0848.. or calling from a number that Microsoft classified as suspicious, caller could be impacted by this feature
- History:
- 2021-09: This feature is being pushed by Microsoft since September 2021 ( cf link below )
- 2021-11: This feature is not only showing a popup about possible Spam, but it is also blocking calls with an IVR asking to enter 2 digits in English and it is not possible to see it from Web Admin Center
- Additional Information: Please refer to https://techcommunity.microsoft.com/t5/public-sector-blog/september-2021-microsoft-365-us-public-sector-roadmap-newsletter/ba-p/2745689 and search for "MC277640 – Spam Notification in Call Toast"
- Solution: Follow procedure below
- Start a powershell window
- Use command Connect-MicrosoftTeams and enter your Teams Admin credentials
- Use command Set-CsTeamsCallingPolicy -Identity Global -SpamFilteringEnabledType "Disabled"
- Wait a few minutes for the change to be active
- Disconnect from Teams Management
 # Connect to Microsoft Teams management
 Connect-MicrosoftTeams
 # Disable the SpamFilteringEnabledType option, if needed, you can enable it back by setting parameter back to "Enabled" value
 Set-CsTeamsCallingPolicy -Identity Global -SpamFilteringEnabledType "Disabled"
 # Unfortunately for the time being, you cannot see your changes in command line nor in https://admin.teams.microsoft.com/policies/calling
 Get-CsTeamsCallingPolicy -Identity Global -Verbose
 # Logout
 Disconnect-MicrosoftTeams
Busy on Busy - Disable Call Waiting[edit | edit source]
- Information: By default call waiting is enabled on Microsoft Teams which mean that if you are already on the phone, you will keep receiving incoming calls that will trigger a popup and a bip even if you are already on the phone
- Problematic: You would like to enable "Busy on Busy" or disable "Call Waiting" not to be bothered by an incoming call when you are already on the phone
- Solutions: Follow one of the 2 solutions below
- (Virtual Teams) : You can disable "Call Waiting / Signal d'appel" from the Kiosk on your user
- Assign to your users a new Calling Policy "Disable Call Waiting", cf below
Create a Calling Policy "Disable Call Waiting"
- Read the "Busy on Busy" section from https://docs.microsoft.com/en-us/microsoftteams/teams-calling-policy
- Connect to https://admin.teams.microsoft.com/policies/calling and create a new Calling Policy
- Name : Disable Call Waiting
- Description : Allow to disable Call Waiting by enabling Busy on Busy feature
- Tick Busy on busy is available when in a call
- Keep all other settings with default values
- Select the user you wish to modify in https://admin.teams.microsoft.com/users
- Go in the "Policies" tab of the user
- Edit the "Assigned policies" and set "Calling policy" = "Disable Call Waiting"
- Save the setting


Intermittent call drops on incoming calls via Microsoft Teams Call Queues[edit | edit source]
- Symptoms: Incoming calls to a Call Queue are intermittently disconnected. Not reproducible on all calls.
- Information: By default on Call Queues the option Conference Mode is enabled, which is using conference resources to connect participants and optimizes call distribution between agents.
Note: Conference Mode is a valid feature and should not be globally disabled.
- Problematic: In some scenarios, this mode may lead to unexpected call termination.
Typical indicator in logs:
“This conversation has ended as only one participant was remaining in the conversation.”
- Solution: First verify the call flow and check if issue is reproducible, also check configuration prerequisites, as behavior may depend on overall architecture and routing design.
test disabling Conference Mode in the Call Queue and try to reproduce the problem.
- Workaround/Quickfix: Disable Conference Mode manually in Call Queue setup (or via PowerShell)
More information: Conference Mode
Microsoft documentation: https://learn.microsoft.com/en-us/microsoftteams/plan-auto-attendant-call-queue
Outgoing Call[edit | edit source]
I cannot call a colleague not using Teams yet / not using Teams anymore dialing his +e164 number on this VTX Teams service[edit | edit source]
- Information: Once you have assigned an +e164 number to a Teams user using VoIP:VTX Teams Connect#Number_Mapping_:_Assign_numbers_to_Microsoft_accounts, if you dial this number from Teams, it will be intercepted by Teams as a local call and will ring only on the Teams account of your coworker
- Symptoms: I am calling a colleague with Teams dialing his +e164 number and it is not working because this colleague is not using Teams on this service anymore / yet
- Solution: Use one of the 2 solution below to have you call towards your colleague +e164 number going out to VTX to be handled as a normal call
- Use VoIP:VTX Teams Connect#Number_Mapping_:_Assign_numbers_to_Microsoft_accounts to remove the number to from the Teams user
- or simply remove the "Phone System" license from this user. Warning: Once license is removed, it is not possible to purge the "OnPremLineURI" from the user, but it is not used anymore anyway
Caller ID policies : I am not able to set a Caller ID policy[edit | edit source]
- Information: This feature is still under development from Microsoft cf https://docs.microsoft.com/en-us/microsoftteams/caller-id-policies
- Problem: You would like to change the Caller ID of a user using a "Caller Id policy" from https://admin.teams.microsoft.com/policies/callinglineid but you are not able ot
- Symptoms: When trying to add a policy, the dropdownlist are empty
- Solution : Change the CLIP from the Kiosk, cf next section VoIP:VTX Teams Connect#FAQ:Teams#CLIP_:_Number_Display_-_I_wish_to_display_a_different_number_than_my_direct_line_for_my_outgoing_calls

CLIP : Number Display - I wish to display a different number than my direct line for my outgoing calls[edit | edit source]
- Problematic: For outgoing calls, you wish to display a number that is different than your direct line number
- Information: By default, you will be allowed to display any number belonging to your trunk ( visible in Kiosk ). If you try to display a number that doesn't belong to your trunk, the system will fallback to your direct line
- Solutions: 2 solutions are possible, one from Teams Admin Center, and another one from VTX Kiosk
- Solution from Teams:
- Read https://learn.microsoft.com/en-us/microsoftteams/caller-id-policies : You can create Caller-ID policy to have some users displaying some resources account numbers (Auto Attendant or Call Queue)
- Go in https://admin.teams.microsoft.com/policies/callinglineid and create a new Caller-ID policy by setting the number that you wish to display
- Go in https://admin.teams.microsoft.com/users and set the new caller-ID policy to the users that need to use it
- Wait some minutes
- Now these users will display the service number for outgoing calls
- Solution from VTX Kiosk:
- Display my company main number : Connect to your Kiosk https://kiosk.vtx.ch/VoIP/ListNumbers.aspx ( My Services / Telephony / Manager your numbers ) / Edit number / Outgoing calls and change number to be displayed
- Display another number belonging to me like my Mobile or a 08x number : Contact VTX to add a "Virtual Number"
- Display any number / Forward Caller Number : Contact VTX to enable "Special Arrangement"
Change number to be displayed in Teams Admin Center


Change number to be displayed in Kiosk

Here is a table explaining what number will be displayed
| Number you wish to display
(From SIP Header) |
Number you wish to Bill
(P-Preferred-Identity) |
"Special Arrangement" setting in VTX CRM | Option D'affichage in Kiosk
(PS: Any number belonging to you could be added by VTX in this list as "Virtual Number") |
Number that will be displayed
(out From SIP Header) |
Real Caller Number
(out P-Asserted-Identity) |
|---|---|---|---|---|---|
| Your direct line A | Your direct line A | % | Your direct line A | Your direct line A | Your direct line A |
| Your direct line A | Your direct line A | % | Another number belonging to you B and managed by VTX
( like a group number, headnumber, INA number... ) |
Another number belonging to you B | Another number belonging to you B |
| Your direct line A | Your direct line A | % | Another number belonging to you B and not managed by VTX |
Another number belonging to you B | Your direct line A |
| An external number like a mobile | Your direct line A | No | N/A | Your direct line A | Your direct line A |
| An external number like a mobile | Your direct line A | Yes | N/A | An external number like a mobile | Your direct line A |
Special Arrangement : I wish to keep the number of the caller being displayed when redirecting call to an external number[edit | edit source]
- Problematic: You are redirecting incoming call towards and external number and you wish to keep the number of the caller being displayed on remote destination
- Problem: Since you are trying to display a number that doesn't belong to your trunk, it is not allowed and caller id will fallback to your direct line
- Solution: Ask VTX to enable the "Special Arrangement" on your trunk, and also ask VTX to add a "+1" to push the project "#2304 - [Kiosk] ConnectPABX - Be Able to Manage Special Arrangement and Number Format from Kiosk Directly"
CLIR : Hide my phone number[edit | edit source]
- Problematic: You would like to hide your number when calling out
- Information: You could also setup CLIR / "Anonymous Call" from the Kiosk, but please either do it from Teams or from the Kiosk, but not from both in the same time, cf VoIP:VTX Teams Connect#CLIP_:_Number_Display_-_I_wish_to_display_a_different_number_than_my_direct_line_for_my_outgoing_calls
- Solution: Follow the solution below
- Open your Teams app, go in the Settings menu / Calls tab
- Scroll down to the "Caller ID" part
- Tick the option "Hide my phone number and profile information for all calls"
- Now you can call out hiding your number
Teams app settings - Hide my phone number and profile information for all calls

Check CDR and Audio Quality Problem[edit | edit source]
Control Call Quality[edit | edit source]
- Problematic: You had a report of poor call quality and you wish to check the statistics of the call
- Solution: Follow the procedure below
- Connect to https://admin.teams.microsoft.com/users
- Select your user
- Go in the "Call history" tab
- Select the call you wish to analyze ( and look at the "Audio quality" )
- Click on the "Network" icon to get access to network stats
- Call Quality : Look at the call quality Good Quality or Poor Quality
- Round-Trip-Time : Look at the Round-Trip-Time, it should be below 150ms, above it, you have a network problem
- Packet Loss: On a perfect network, there should not be any packet loss, but some packet loss could appear during call setup.


Audio Delay problem[edit | edit source]
- Symptoms: You have huge delay over your Teams client that prevent you from having a normal interaction with your interlocutor
- Possible Audio Delay source : RDP, Internet Connection, VPN, Team cloud problem
- Problematic : You need to perform some tests to identify the source of the problem
- Test Call numbers
- "/testcall" ( "/Testanruf" in German ): Teams test call number that can be used to test latency within Teams Cloud. Simply call "/testcall" ( "/Testanruf" in German ) from Teams Call Tab to test latency between your Teams_Client <-> Teams_Cloud
- +41225117902 : VTX Echo Test number will echo back what you are saying allow you to check audio latency between your Teams_Client <-> Teams_Cloud <-> VTX_SBC <-> VTX_Echo_Test_Server
- Checks to perform : Here are checks to perform to find the source of the latency
- Control Call Quality: Use previous section to check the call Quality of the calls, cf VoIP:VTX Teams Connect#Control_Call_Quality
- Teams Service Health Check : Control if Teams is acknowledging a problem VoIP:VTX Teams Connect#Service_Health_-_Get_notified_when_there_is_a_problem_with_MS_Teams
- Testcalls: Use testcall numbers above to test if problem comes from Teams cloud or from Teams Cloud <-> VTX Platform interconnection
- RDP/VPN : Disable RDP ( use a local Teams client ), disable your VPN and test again
- Speedtest : Use https://speed.vtx.ch to test your connection
- How to solve the problem
- Teams Cloud Problem : Wait that Microsoft solves the problem
- Network Problem
- RDP : Try using a local Teams client and not one over RDP
- VPN : Try to disable your VPN and test again
- QOS : If you have an intelligent Firewall that could setup QOS, you should setup QOS towards Teams Platform, cf Network:Firewall:Configuration#Teams_Connect.2FVirtual_Firewall_Rules
- Get help from VTX Support if needed

Voicemail Management[edit | edit source]
Disable Call redirection to Voicemail[edit | edit source]
- Problem: If you Teams client is not started, all your incoming calls will be redirected to Teams Voicemail instantly
- Problematic: You would like to disable redirection towards your voicemail
- Additional Information: Please refer to https://support.office.com/article/manage-your-call-settings-in-teams-456cb611-3477-496f-b31a-6ab752a7595f
- Solution: Follow the following procedure
- Open Microsoft Teams Application
- Click on your user icon and go in the Settings parameters
- Go in the Calls tab
- In the "If not answered" section, select "Do Nothing" instead of "Voicemail"

PS: You can also disable the Voicemail using Powershell ( cf https://docs.microsoft.com/en-us/powershell/module/skype/set-csonlinevoicemailusersettings?view=skype-ps for more information )
Set-CsOnlineVoicemailUserSettings -Identity login@domain.ch -VoicemailEnabled $false

VoicemailEnabled                         : False
PromptLanguage                           : en-US
OofGreetingEnabled                       : False
OofGreetingFollowAutomaticRepliesEnabled : False
OofGreetingFollowCalendarEnabled         : False
ShareData                                : False
CallAnswerRule                           : RegularVoicemail
DefaultGreetingPromptOverwrite           :
DefaultOofGreetingPromptOverwrite        :
TransferTarget                           :
Change Voicemail Settings ( Language, record prompt, Text to speech, ...)[edit | edit source]
- Problematic: You would like to change some settings of your voicemail like the language of the prompt
- Information: The default language of your user will depend on the default language selected by your administrator. But you can change it in this menu
- Solution: Follow the following procedure
- Open Microsoft Teams Application
- Click on your user icon and go in the Settings parameters
- Go in the Calls tab
- Click on the Configure Voicemail" button and change the settings you wish to change ( Language, record record prompt, Text to speech, ... )

PS: You can also change the Voicemail Language settings using Powershell ( cf https://docs.microsoft.com/en-us/powershell/module/skype/set-csonlinevoicemailusersettings?view=skype-ps for more information )
Set-CsOnlineVoicemailUserSettings -Identity login@domain.ch -VoicemailEnabled $true -PromptLanguage de-DE
Set-CsOnlineVoicemailUserSettings -Identity login@domain.ch -VoicemailEnabled $true -PromptLanguage fr-FR
Set-CsOnlineVoicemailUserSettings -Identity login@domain.ch -VoicemailEnabled $true -PromptLanguage en-US


VoicemailEnabled                         : True
PromptLanguage                           : en-US
OofGreetingEnabled                       : False
OofGreetingFollowAutomaticRepliesEnabled : False
OofGreetingFollowCalendarEnabled         : False
ShareData                                : False
CallAnswerRule                           : RegularVoicemail
DefaultGreetingPromptOverwrite           :
DefaultOofGreetingPromptOverwrite        :
TransferTarget                           :
CPE MS Teams[edit | edit source]
Easy Login for an IP Phone Teams Edition using a PC[edit | edit source]
| Login in on a phone is complex because you cannot copy paste login and password that can be quite long. But you can use this procedure to login a Teams phone without entering any credentials on it ! |
- Power up the MS Teams edition phone on a working network
- Click on the screen asking that you wish to login from a remote PC
- Click on this link on your PC https://microsoft.com/devicelogin
- Type the code that it visible on the phone
- Enter the Teams credentials of the phone
- Done, your phone will connect with the correct account

SIP Devices Phone Management[edit | edit source]
- Information: Since 2022, you can now also link a lot of SIP Phones with your Teams account in order to receive Teams Phone calls on them
- Problematic: You wish to map a SIP Phone to your Teams account
- Solution: Follow the procedure below ( Additional Information available in https://docs.microsoft.com/en-us/microsoftteams/sip-gateway-configure )
- Compatible CPE: Verify that your Phone model is listed in https://docs.microsoft.com/en-us/microsoftteams/sip-gateway-plan#compatible-devices
- Allow SIP Devices: Go to the Teams Admin Center / Voice / Calling policies : https://admin.teams.microsoft.com/policies/calling
- Edit the Main Calling Policies you are using ( usually the "Global" one )
- Enable "SIP devices can be used for calls", and then select Save. You might need to wait a little bit afterwards
- CPE Reset
- Remove your SIP Device from any provisioning or redirection server ( @VTX: Simple unmap the SIP account in the Kiosk )
- Factory reset the phone
- Declare CPE : Go to the Teams Admin Center / Team devices / SIP devices : https://admin.teams.microsoft.com/devices/sipdevices
- Click the "Actions" top right corner button / Provision Devices
- Add the MAC address of the phone
- Connect to the phone web interface and set the provisioning URL to http://emea.ipp.sdg.teams.microsoft.com
- Restart the phone.
- It will get a Teams logo and might upgrade/downgrade firmware
- Follow wizard in web interface, you will be asked to dial a number from the phone to authenticate it like *55*<code>
- Then the phone will be linked to the platform, now you need to link it with a user
- Link phone with a Teams account
- Keep following the wizard
- You will be asked to ask end user to connect to https://microsoft.com/devicelogin and enter the activation code to link the phone with the Teams account
- Once done, you can wait or reboot the phone and you will start receiving Teams calls on your SIP device


Teams Edition Phone Management[edit | edit source]
Use a configuration Template to setup Language and Timezone on the phones[edit | edit source]
- Information: Phone setup could be managed from Teams Management interface. You can setup some parameters like language, timezone and other options, ...
- Solution: Follow the procedure below
- Connect to https://admin.teams.microsoft.com/devices/ipphones-configprofile and click the Add button
- Create a new Configuration Profile changing default parameters with your needs
- Timezone: Warning, Switzerland location timezone for Daylight Saving mode is buggy, please use Paris timezone instead. Bug reported to Yealink in " Issue: T58V MS Teams - Daylight Daving problem Switzerland/Bern (ID:105846)"
- If it is still not working afterwards and pending Fix, connect on the phone, go in Time&Date setup and set "Location = Paris"
- Connect to https://admin.teams.microsoft.com/devices/ipphones
- Select the phones for which you wish to set the new profile
- Click the "Assign configuration" button and select the newly created profile you created
- Be patient, it takes a few minutes/hours for the change to be push towards the phones
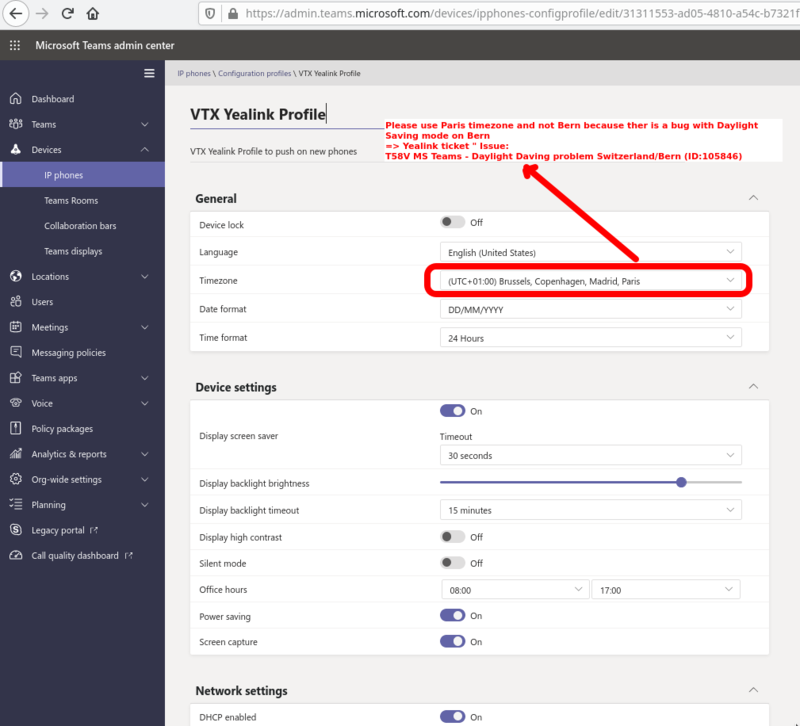
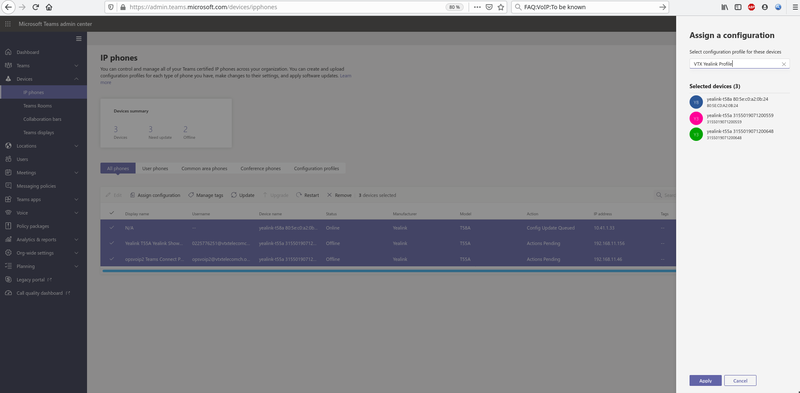
Manage your Teams IP Phones ( firmware upgrade, reboot, screenshot, network capture,... )[edit | edit source]
| When performing changes, you need to be really really patient, it can take several hours for your actions to be executed |
- Information: You can manage your phones behind your Teams environment directly from Teams Admin Web Interface
- Connect to https://admin.teams.microsoft.com/devices/ipphones and execute the actions you wish to do
- Ex: Firmware Update : Select all your phones and enable automatic update with a 90 days delay, so you keep your phones up to date but you are not the 1st customer to beta test a new firmware
Contacts Management[edit | edit source]
"Your contacts are out and about - Let's bring them in" : Empty contact list[edit | edit source]
- Symptoms: When you go in the contact tab of your Teams phone, you do see an empty list with the message "Your contacts are out and about - Let's bring them in"
- Explanation: This tab will only show you your own and favorites contacts
- Solution: Use the following procedure
- Use the search icon at the top right corner to search for a Teams Contact ( you can call it from there )
- Once you have displayed the contact, you can also use the "..." menu to add this contact if your "All Contacts" list

Debug Phone[edit | edit source]
Download Device logs[edit | edit source]
| The device logs might be truncated after 12h, so it is important to get the logs as soon as you have a problem |
| If the device firmware is not up to date, start by updating it, reporting a bug on a deprecated version doesn't make any sense |
- Problematic: You wish to get the phone device logs to be able to analyze a problem
- Solution: Follow the procedure below
- Connect to https://admin.teams.microsoft.com/devices/ipphones
- Select the phone you wish to analyse by clicking on its name
- Click the "Download device logs" button
- Wait 10 minutes
- Click the "History" tab to download the "Diagnostic file"


Other Questions[edit | edit source]
External Access - Allow to chat and call any other Microsoft Teams user[edit | edit source]
- Problematic: You would like to be able to chat and talk with other company also using Microsoft Teams ( and also Skype )
- Solution: Follow the procedure below
- Connect to https://admin.teams.microsoft.com/company-wide-settings/external-communications
- Set Users can communicate with other Skype for Business and Teams users = On
| You can also decice to allow only some domains |

Service Health - Get notified when there is a problem with MS Teams[edit | edit source]
- Information: You can setup Teams Service Health notification in the Admin Center . It will allow you to receive emails when there is a problem with MS Teams platform, or new features
- Solution : Follow the procedure below
- Connect to https://admin.cloud.microsoft/adminportal/home#/servicehealth
- Go to Preferences / Email tab
- Setup an email and tick "Send me email notification about service health"
- In "Include these issue types" : Tick "Incidents" and "Advisories"
- In "Include these services" : Tick at least "Teams"

How to unassign numbers[edit | edit source]
- Problematic: You would like to unmap a number from Teams
- Solution: Use one of the procedure below
- If the user is not needed anymore you can simply delete the user in admin center, it will unmap the number
- (Virtual Teams only): Additionally you need to unmap the "Microsoft Teams Virtual" license in the Hardware Module: Unassign the Microsoft Teams Virtual license
- Use the VTX Powershell Script "VTX_Teams_Assign_Numbers.ps1" to remove the number from a user: Unassign numbers using the VTX Powershell Script VTX_Teams_Assign_Numbers.ps1
- Use Powershell Command Prompt "Remove-CsPhoneNumberAssignment" to manually remove the number from the user: Unassign numbers manually in Powershell Command Prompt - Remove-CsPhoneNumberAssignment
Emergency or Short numbers calls not working[edit | edit source]
- History
- 2026-01-21: Since version 4.7+ of the CELESTE powershell scripts, addition and deletion of needed dial plan rules for emergency numbers and short numbers in embedded in the scripts
- Symptoms: When you dial an emergency number or a short number, a +33 or +41 prefix is added
- Solution: Follow procedure below
- Read VoIP:Teams:Microsoft_Management#Dial_Plan_for_Emergency_Numbers_+_Short_Numbers_+_Special_Setup
- Verify in https://admin.teams.microsoft.com/one-policy/settings/dialplan that you are missing the dial plan rule
- Make sure you run last version of the powershell script using VoIP:Teams:Powershell#Update_all_VTX_Powershell_scripts_to_last_version
- Run again the VTX_Teams_Create_Routing_Rules.ps1 script on your domain , it will add the rules
Call Queue[edit | edit source]
When hanging up a call, it takes a lot of time before receiving a new call already in the queue[edit | edit source]
- Information: Call Queue handling in Teams is completely independent from VTX, if you have a problem with it, if you are able to reproduce the problem by calling the Call Queue name or number directly from Teams itself, then it would confirm problem is 100% Teams related and should be debug on Teams Admin interface or with MS support
- Symptoms: You belong to a Call Queue and you were handling a call, you hangup a call but you do not instantly receive calls in the queue
- Clue: You did specify a too high value for "Call agent alert time (seconds)" in "Agent selection" tab, so it takes ages to have the newly free agent ringing in the queue
- Solution: Decrease back the value of "Call agent alert time (seconds)" to 15s ( minimum value). Once an agent is free again, it will start ringing back within 15s.
- Additional Information: In Call Queue setup, there are 2 parameters that interest us here (Call agent alert time (seconds) and Maximum wait time) that are described in https://docs.microsoft.com/en-us/microsoftteams/create-a-phone-system-call-queue

Auto-Attendant[edit | edit source]
No ring back tone after redirecting an Auto-Attendant towards an external number[edit | edit source]
- Symptoms: You have redirected an AutoAttendant towards an external number and you do not hear any ringtone until the remote phone answer the phone
- Explanation: Until Media-Bypass is enabled on VTX SBC with Teams, the incoming call towards Teams and the outgoing call towards the remote phone are 2 independent calls that need to be bridged by Microsoft Teams Cloud, but it is not done correctly for the time being
- Solution (not ready):
- Workaround: Redirect the auto attendant towards an empty Call-Queue that redirects towards the external number, cf below
- cf VoIP:VTX_Teams_Connect#Resource_Management to Create a new Call Queue
- Set no agents in this queue and Set "Call timeout handling" to 0 min / 0 s
- Redirect to External number and enter the external number
- Redirect your auto-attendant towards this new Call Queue
- Call Queue will always send a ring back tone while your remote destination is being called

Redirect an Autoattendant to a Teams Audio Conference Room[edit | edit source]
- Problematic: You wish to assign one of your number to a Teams Conference Room Number to be able to communicate meetings with a number belonging to you
- Problem: Microsoft doesn't allow to use Direct Routing Numbers with Conference Room except for the US DOD. It is only working with the numbers provided by Microsoft Directly
- Information:
- On MS documentation, it seems that Direct Routing Audio Conferencing System is only possible for US Department of Defense, cf https://learn.microsoft.com/en-us/microsoftteams/audio-conferencing-with-direct-routing-for-gcch-and-dod
- But in https://learn.microsoft.com/en-us/microsoftteams/audio-conferencing-on-network it is said that we can redirect/map a call to a conference number
- Solution: You can "simply" redirect a Teams Auto attendant towards the conference number following solution below
- Order a Teams Audio Conferencing license ( ex: It is part of "Office E5")
- (Identify the Teams Conferencing Number ) Connect to https://admin.teams.microsoft.com/phone-numbers or use the powershell command Get-CsOnlineDialInConferencingBridge (cf below). Here number is +41432161259
- Create an auto attendant with a number belonging to your trunk ( cf sections above )
- Redirect this number using auto attendant setup towards this number. So in my example, I am redirecting +41215776420 (number belonging to my company) towards +41432161259 ( MS Conference bridge number )
- So now I can communicate on our company number for conference calls
PS H:\> Get-CsOnlineDialInConferencingBridge
Identity             : 956792e9-277a-4e9e-95f8-abcc9df13ec1
Name                 : Conference Bridge
Region               : EMEA
DefaultServiceNumber : 41432161259
IsDefault            : True
ServiceNumbers       : {61272084724, 864009196440, 85230086055, 912262590665...}

