Cloud:Business Cloud (IaaS)
From VTX Public Wiki

Business Cloud (IaaS)[edit | edit source]
Installation and basic configuration[edit | edit source]
Adding internal networks[edit | edit source]
| Note: The Edge service is not created automatically, it's an optional add-on so according your service it's possible that Edge is not available on your IaaS service. In that case the VMs will be connected directly to the public network by default. |
The network will allow to you to connect your VM to the internet over Edge. Edge is the gateway which is created automatically by VTX with the public IP address assigned to your vDC (Virtual Data Center). Before creating a VM, you'll need to create your network and after that attach your VM to it.
From your vCloud admin interface, go to Networking -> IP Spaces and then New.
- Name: Choose a network name, example: Internal-172.16.0.0/16
- Route Advertisment: Off
- Internal Scope: 172.16.0.0/16
- External Scope: Empty
- IP Ranges: Empty
- IP Prefixes: Click on Add:
- First in Sequence: 172.16.0.0/16
- Number of Prefixes: 1
- Finish
Click on the created network Internal-172.16.0.0/16 -> IP Prefixes and then Allocate:
- Prefix Size: /16
- Number of Prefixes: 1
- Allocate
Now the IP space has been created and can be used for internal networks as follows:
From your vCloud admin interface, go to Networks then New.
- Depending on the requirements you can choose between an Isolated or Routed network. If you want to place your VMs directly to the internet, choose Routed.
- Name: Choose a network name
- Gateway CIDR: Enter the IP address of the gateway and the netmask in CIDR notation. Example: if you want to use an IP range 172.16.0.0/16, you need to put here the IP address for the gateway with the mask, ex. 172.16.0.1/16
- Description: Describe the network
- Shared: It allows you to to share this network with networks from other Virtual Data Center (vDC) in the same organization. You can disable this feature as there is only 1 vDC.
- Edge Connection Choose the Edge gateway provided by VTX.
- Interface Type Choose Internal if you want to create an isolated (internal) network and optionally connect the VM to the Edge gateway to access the internet with a public IP
- Static IP Pools Here you can enter an IP range that will be used for VMs. Upon creation of a VM the next free IP of that pool will be selected. Alternatively, you can assign each VM a static manual IP address.
- DNS: By default, your Edge Gateway will use the VTX DNS servers. If you want you can use custom DNS servers by unchecking Use Edge DNS.
When is done, go the the last step Ready to Complete then click on the Finish button
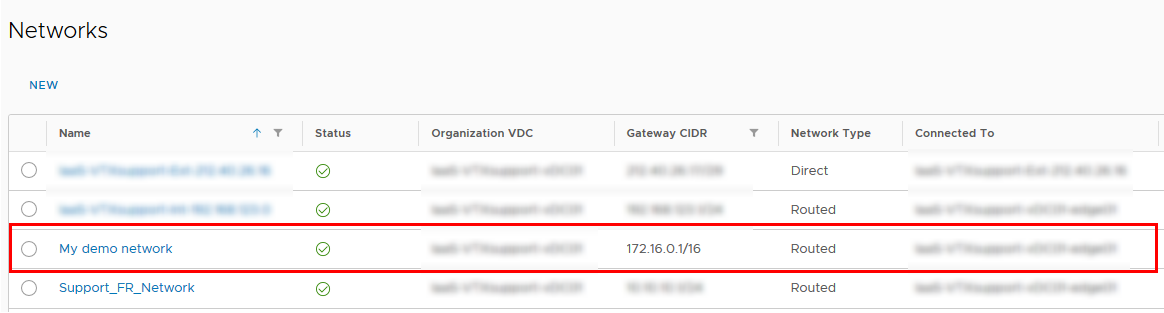
Your network is now created and available:
When the network is created, go to Edges and select your Edge gateway then click on the Services link.
- Stay on the Firewall tab
- By default, a rule is created and named Default rule for ingress traffic. It is used to block all traffic from the internet to the vDC network.
- So to allow internet access for the VMs, a new rule has to be added as follows:
- Check the Source column then click on the + button
- Browse objects of type: field, choose Gateway Interface
- On the left, select your network and move it to right
- Click on the Keep button
- Click on the Save changes at the top of right to reload the Edge configuration and apply the changes

When the changes are done, your network is "renamed" on the Source column, your first network created will renamed to vnic-1, the second vnic-2, etc...
Managing Catalogs and upload ISOs[edit | edit source]
By default, some ISOs are available from vCloud (Windows and Linux) but if you want you can create your own library with our ISO. To do that in vCloud Director, click to Libraries then Catalogs
- Click to New link
- Choose a name and description
- Click on the OK button
When the library is created, go on the Media & Other menu and:
- Click on the Add link
- Choose the library then choose your ISO
- Click on the OK button to start the upload
Then the ISO will be available for your VM.
| When you upload an ISO, it will take some space from your vDC storage. |
Creating the first VM step-by-step[edit | edit source]
To create a VM, go to your vDC then click on the New VM link
- Name: Choose a name for your VM on vCloud Director
- Computer name: Chose the hostname for your VM. This settings will have no effect on the VM itself if you don't use VMware Tools and don't enable the Guest Optimization.
- Description: Choose a description of your VM
- Type: If you have a VM template you can choose it. If not choose New and uncheck the box Power on.
- OS family: Choose the kernel OS, Windows, Linux or other
- Operating System: Choose the OS and version that you will install
- Boot image: Choose the ISO, if you created a custom library you will be able to see your own ISO
- Select a Size: By default, you can choose some default ressources (Small, Medium, Large) or if needed you can check the Custom Sizing Options case and configure the ressources that you want.
- On the Storage table, choose the IaaS SSD on the Storage Policy column then choose the SSD
- On the Networking table, choose your internal network created previously.
- IP Mode: You can choose for example Manual IP to assign the VM a static IP manually. Select Static IP Pool to assign the VM the next available IP from the previously configure Static IP Pool. This settings will have no effect on the VM if you don't use VMware Tools and don't enable the Guest Optimization.
- When all settings has been done, click on the OK button, VM will be created in few seconds.
Network configuration:

Connecting VMs to external network with outgoing NAT rule
By default access to the public internet is blocked. You'll need to create a SNAT rule to enable internet access for your VMs.
Go to Edges, select your Edge gateway and click to the Services link then click on the NAT tab.
- Click on the + SNAT Rule button
- Applied On: Select our Edge gateway
- Original Source IP/Range: Select the local IP of your VM
- Translated Source IP/Range: Click on the Select button, you should be able to choose one of our public IP provided by VTX
- Destination IP Address: Put any
- Destination Port: Put any
- Description: If needed you can choose a description
By default the rule will be enabled by the toggle button Enabled, if you want you can enable the log with toggle button Enable logging. When is done, you can create the rule by clicking on the Keep button.
When the rule is created, click on the Save changes link at the top right of the screen, it will reload the Edge rule to apply the new configuration.
First start of your VM[edit | edit source]
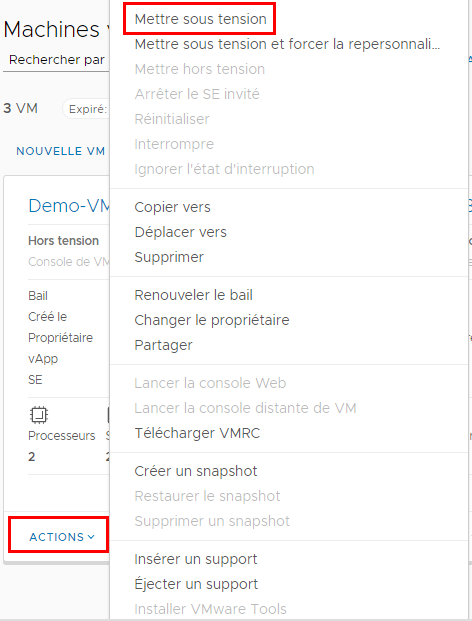
When all this steps are done, you can start your VM by clicking on the Actions button then Power On.
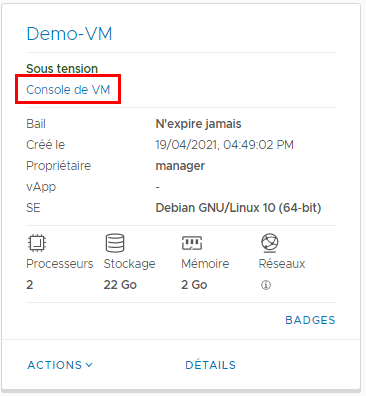
When VM has been started, you can use the console by clicking on the VM Console link
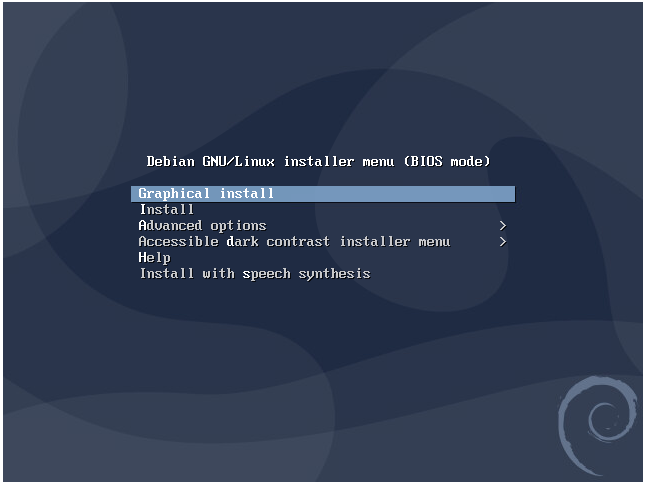
Then you can start your OS installation/configuration
Note: In our case, we don't enabled any DHCP server on the Edge gateway, by default your OS will try to have an IP by DHCP, at this time you will have a network configuration failed.

After the network configuration, the OS will be able to connect on the network and download the utility package
Knowledge base[edit | edit source]
Create a Firewall rule on Edge[edit | edit source]
From vCloud Director, go to Edges, click on your Edge gateway then click on the SERVICES link.
You should now be on the first tab "Firewall".
We recommend to enable "Show only user-defined rules" to cleanup the build-in rules.
- Click on the + sign.
- Double click on the name to rename "New Rule" by the name that you want like for example : "SSH access to the VM".
- Define the "Source", "Destination", "Service" & "Action".
- Click on "Save changes" on the top yellow banner.
Your rule is now active.
Create a NAT rule on Edge[edit | edit source]
From vCloud Director, go to Edges, click on your Edge gateway then click on the SERVICES link.
- Go to the NAT tab then click on the + DNAT Rule button
- Applied On: Your Edge Gateway
- Original IP/Range: Choose the public IP that your VM is using
- Protocol: TCP, UDP, ICMP or any
- Original Port: The port that you want to use from the remote client to connect on the VM
- Translated IP/Range: LAN IP of your VM
- Translated Port: The port on which your VM is listening
- Source IP Address: For security reason you can restrict the NAT rule to one IP or network or for the whole internet by putting any.
- Source port: put any
- Description: If you want, choose a description for your rule.
- Click on the Keep button
- Click on the Save changes link to reload the Edge configuration
When is done, go to Firewall tab then click to the + button, it will create a new rule, named by default New Rule.
- Name: Choose a name of your rule
- Source: For security reason you can restrict the port to one IP or network or for the whole internet by putting any.
- Destination: Choose the public IP used by your VM
- Service: Click on the + button then
- Protocol: Choose the protocol used
- Source Port: any
- Destination Port: Port who will used on your NAT rule
- Click on the Keep button
- When is done, click on the Save changes to reload the Edge configuration
To test your NAT rule and if VM is runing, you can use telnet from another computer. Ex. for the rule who has been created:
telnet [ip or hostname] [port]
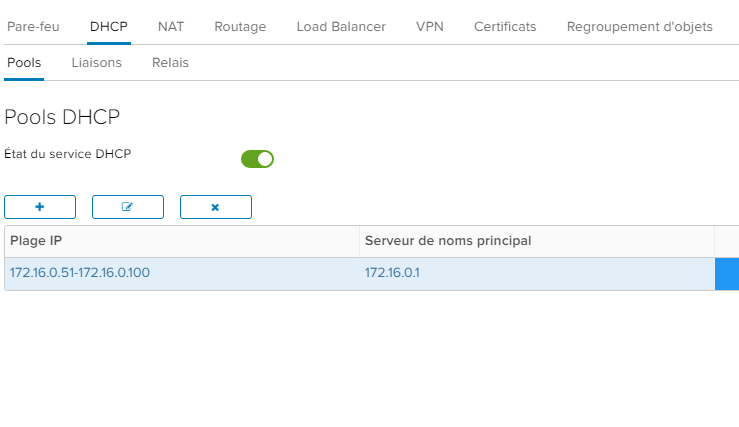
Enable DHCP server on your network[edit | edit source]
To allow to your VM to use an IP address by DHCP, you can enable this service. Go to Edges, select your Edge gateway then click on the Services link
- Go to the DHCP tab
- Enable the DHCP
- Click on the + button
- IP Range: Choose the first and last IP on the range according your network. ex. 172.16.0.51-172.16.0.100
- Domain Name: You can leave this filed empty if you didn't configured a domain on your network
- Auto Configure DNS: You can enable it, by default it will use your Edge gateway (who is using the VTX DNS server) or if you disable it, you can choose manually DNS server
- Default Gateway: Use the default gateway that your configured on your network, ex. 172.16.0.1
- Subnet Mask: Use the subnet mask that you choose when you created your network, ex. 255.255.0.0
- By default, the DHCP bail is configured to 24h (86400 seconds), you can change it on the Lease Time field or enable Lease Never Expires if you don't want to enable the bail expiration
- Click on the Keep button
- Click on the Save changes link at the top of right to reload the Edge configuration
Now when you create a new VM, you can use the DHCP method to attribute an IP address, during the OS installation, a DHCP request will be done and the VM will be able to receive an IP from the DHCP service.
Create / restore / delete a snapshot of your VM[edit | edit source]
It can be useful when you finished to configure your VM to make a snapshot of it and be able to restore it later if needed.
From vCloud Direct, click on Actions then Create Snapshot, on the new pop-up simply click on the Create button, default settings are corrects.
| You can create only one snapshot at the same time and the snapshot will use you own disk space of your Organisation. |
To restore or delete a snapshot, click on the Actions link then choose Revert to Snapshot or Remove Snapshot
Install VMware tools[edit | edit source]
Windows[edit | edit source]
Go to Actions on the Vm then click Install VMware Tools, then the installer should pop up on the console. If not, open the CDROM (virtual CDROM with VMware Tools) and start setup
Linux distribution[edit | edit source]
You can simply connect you to your VM and install the open-vm-tools package.
- Debian/Ubuntu: apt install open-vm-tools
- centOS: yum install open-vm-tools
- Fedora: dnf install open-vm-tools
Change the local IP and/or the hostname of your VM from vCloud[edit | edit source]
| VMware Tools need to be installed on the VM. |
- Power off your VM (shutdown from the OS then from vCloud, Actions link and Power Off)
- From vCloud, click on the Details link on your VM
- To change the IP:
- Go to the NICs menu then click on the EDIT link to edit the network adapter.
- On the IP field, change the IP address and put the one that you want to use
- Click on the Save button
- To change the hostname:
- Go to General menu then click on the EDIT link
- Change the hostname on the Computer Name field.
- Click on the Save button
- Go to the Guest OS Customization menu then click on the EDIT link
- Check the case Enable guest customization
- Click on the Save button
- Power on your VM
When your VM has been started, you can check the IP address and hostname, it should be the one that you put on vCloud
Activate Windows using VTX public KMS Server[edit | edit source]
- Login to the server you want to activate
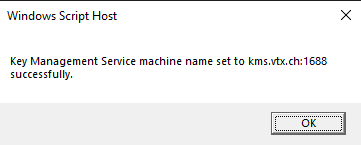
- Launch a command line as admin and execute the command below to set the KMS hostname
slmgr /skms kms.vtx.ch:1688
You will see a confirmation pop-up as shown below
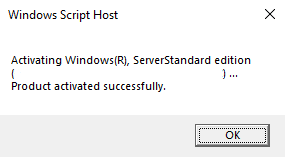
Click OK and in the same command line type the command below
slmgr /ato
If the activation was successfull you will see the pop-up below
Attach/Change the network of a NIC VM[edit | edit source]
- "Power Off" the VM via "ACTIONS" menu (Do not use "Suspend").
- Click on "DETAILS" of you VM.
- Under "Hardware" click on "NICs" then "EDIT".
- Under "Network" choose the network to attach to this NIC VM.
- Click on "SAVE".
Additional Services on Business Cloud (IaaS)[edit | edit source]
Installation of a 3CX system on Business Cloud (IaaS)/Managed Cloud Server[edit | edit source]
Related Products[edit | edit source]

|

|

|
| Veeam Backup for IaaS | Managed Cloud Server | Web Cloud Server |
| The enterprise cloud backup solution by VTX | Your critical applications on ahigh-availability virtual server | Host your websites on a virtual server optimised for the Web! |