Cloud:Business Cloud (IaaS): Difference between revisions
From VTX Public Wiki
m (Removed protection from "Cloud:Business Cloud (IaaS)") |
No edit summary |
||
| Line 3: | Line 3: | ||
[[File:Banner BC IaaS.png|center|frameless|1280x250px|link=]] |
[[File:Banner BC IaaS.png|center|frameless|1280x250px|link=]] |
||
= |
=Business Cloud (IaaS)= |
||
<center><big>The VTX Business Cloud (IaaS) service provides a virtual data centre environment based on vmWare vCloud Director. </center> |
<center><big>The VTX Business Cloud (IaaS) service provides a virtual data centre environment based on vmWare vCloud Director. </center> |
||
<center>With this environment you can create, configure and manage a set of Virtual Machines (VM).</center> |
<center>With this environment you can create, configure and manage a set of Virtual Machines (VM).</center> |
||
| Line 10: | Line 10: | ||
<big>Please find below a knowledge base to help you with the configuration.</big></center> |
<big>Please find below a knowledge base to help you with the configuration.</big></center> |
||
= |
=Installation and basic configuration= |
||
== |
==Adding internal networks== |
||
== |
==Managing Catalogs and upload ISOs== |
||
== |
==Creating the first VM step-by-step== |
||
== |
==Connecting VMs to external network== |
||
== |
==Managing NSX Edge Firewall rules== |
||
= |
=Knowledge base= |
||
== |
==Activate Windows using VTX public KMS Server== |
||
#Login to the server you want to activate |
#Login to the server you want to activate |
||
#Launch a command line as admin and execute the command below to set the KMS hostname |
#Launch a command line as admin and execute the command below to set the KMS hostname |
||
<br> |
<br> |
||
<code>slmgr /skms kms.vtx.ch:1688</code> |
<code>slmgr /skms kms.vtx.ch:1688</code> |
||
| Line 40: | Line 41: | ||
[[File:Activation successful.png|400px]] |
[[File:Activation successful.png|400px]] |
||
= Related Products = |
|||
<br /> |
|||
{| class="wikitable" style="width:100%; text-align:center;" |
|||
|+ |
|||
| width="16.66%" |[[File:Picto services easyshare blue.png|link=|frameless|150x150px]] |
|||
|[[File:Picto services managed cloud server blue.png|link=|frameless|150x150px]] |
|||
| width="16.66%" |[[File:Picto services web cloud server blue.png|link=|frameless|150x150px]] |
|||
|- |
|||
|'''Veeam Backup for IaaS''' |
|||
|'''Managed Cloud Server''' |
|||
|'''Web Cloud Server''' |
|||
|- |
|||
|The enterprise cloud backup solution by VTX |
|||
|Your critical applications on a |
|||
high-availability virtual server |
|||
|Host your websites on a virtual |
|||
server optimised for the Web! |
|||
|} |
|||
<span> </span> |
|||
Revision as of 07:45, 20 April 2021

Business Cloud (IaaS)[edit | edit source]
Installation and basic configuration[edit | edit source]
Adding internal networks[edit | edit source]
Managing Catalogs and upload ISOs[edit | edit source]
Creating the first VM step-by-step[edit | edit source]
Connecting VMs to external network[edit | edit source]
Managing NSX Edge Firewall rules[edit | edit source]
Knowledge base[edit | edit source]
Activate Windows using VTX public KMS Server[edit | edit source]
- Login to the server you want to activate
- Launch a command line as admin and execute the command below to set the KMS hostname
slmgr /skms kms.vtx.ch:1688
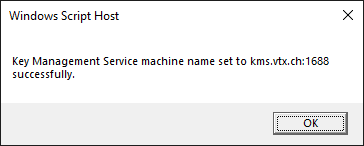
You will see a confirmation pop-up as shown below
Click OK and in the same command line type the command below
slmgr /ato
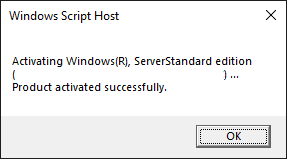
If the activation was successfull you will see the pop-up below
Related Products[edit | edit source]

|

|

|
| Veeam Backup for IaaS | Managed Cloud Server | Web Cloud Server |
| The enterprise cloud backup solution by VTX | Your critical applications on a
high-availability virtual server |
Host your websites on a virtual
server optimised for the Web! |


