VoIP:VTX Teams Connect: Difference between revisions
From VTX Public Wiki
(→Verify User Setup: Microsoft Teams App - New Icon and number displayed) |
(→Microsoft Teams App - New Icon and number displayed: Restart is not supposed to be needed, if you have waited a long time, please try to exit the app and start it back) |
||
| Line 433: | Line 433: | ||
Once the license and numbers have been assigned to a user, you will need to wait between a few minutes and 24h depending on Microsoft Teams latency until being able to have the new Call Icon and being able to use your number |
{{Notice|1=Once the license and numbers have been assigned to a user, you will need to wait between a few minutes and 24h depending on Microsoft Teams latency until being able to have the new Call Icon and being able to use your number}} |
||
# Enable the needed license ( Teams + Phone System ) |
# Enable the needed license ( Teams + Phone System ) |
||
# Assign the number to the desired user |
# Assign the number to the desired user |
||
# Wait for some time |
# Wait for some time |
||
| ⚫ | |||
# (PC) Exit the app and start it back |
|||
# You will see a new Call icon + the user number on the app |
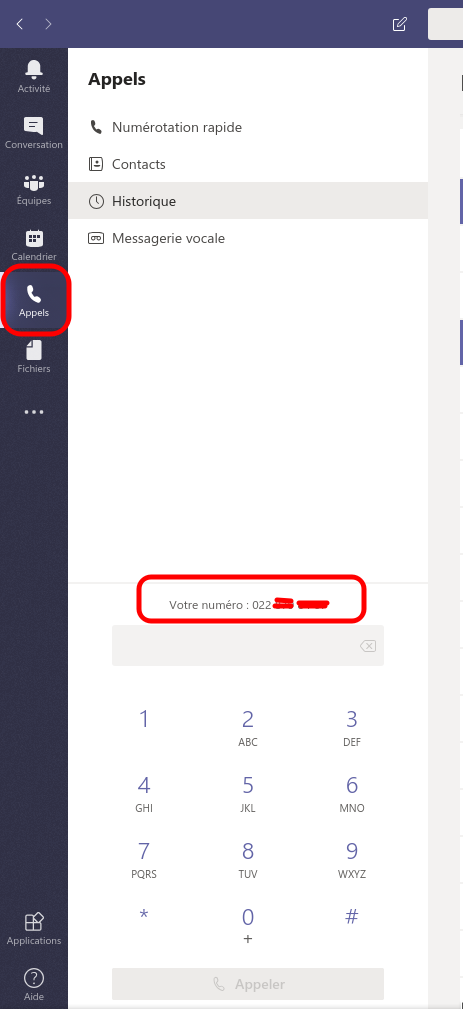
# You will see a new Call icon + the user number on the app |
||
| ⚫ | |||
## (PC) Restart is not supposed to be needed, if you have waited a long time, please try to exit the app and start it back |
|||
# Now you can start calling using your VTX "Connect Teams" service |
# Now you can start calling using your VTX "Connect Teams" service |
||
Revision as of 10:09, 13 May 2020
With VTX Teams Connect, use Microsoft Teams as your main Telephony Solution
Introduction[edit | edit source]
The purpose of this page is to explain how to setup and manage a VTX Teams Connect service to integrate it within your Microsoft 365 domain. A presentation of the service is available at https://www.vtx.ch/fr/corporate/telephonie/teams-connect and https://www.vtx.ch/de/corporate/telephonie/teams-connect
Setup Process Overview[edit | edit source]
Here is the process that will allow you to setup the service
- Follow requirements below VoIP:VTX_Teams_Connect#Requirements
- Order VTX Teams Connect: You need to order a VTX Teams Connect service at VoIP:VTX_Teams_Connect#VTX_Teams_Connect
- Order Microsoft 365: You need to have or order a Microsoft 365 account at VoIP:VTX_Teams_Connect#A_Microsoft_365_domain_and_accounts
- Powershell: Use a Windows PC or Server to create routing and assign numbers at VoIP:VTX_Teams_Connect#Microsoft_Windows_PC.2FServer_with_Powershell
- Setup Domain in VTX Kiosk: You will link your VTX Teams Connect domain with your Microsoft account at VoIP:VTX_Teams_Connect#Link_your_.3CSERVICE_NUMBER.3E.teams.ipvoip.ch_Domain_between_Microsoft_and_VTX_Telephony_platform
- Create Voice Routing: You will create the Voice Routing within Microsoft Teams platform at VoIP:VTX_Teams_Connect#Voice_Routing_:_Create_Voice_Routing_to_allow_your_users_to_use_VTX_Teams_Connect
- Assign Numbers: You will assign numbers to your users and start using VTX Teams Connect service at VoIP:VTX_Teams_Connect#Number_Mapping_:_Assign_numbers_to_Microsoft_accounts
Requirements[edit | edit source]
You will find below all the needed requirements to use VTX Teams Connect Service
- A VTX Teams Connect service
- A Microsoft 365 domain and accounts with the needed Microsoft licenses ( Microsoft Teams + Microsoft 365 Phone System )
- A Microsoft Windows PC/Server with Powershell app and the needed modules to assign numbers to users ( we are working on an integration in the Kiosk too )
VTX Teams Connect[edit | edit source]
VTX Teams Connect service allows a smooth and easy integration between Microsoft 365 Teams services and the telephony world ( PSTN ) allowing you to use Microsoft service to pass and receive calls using Desktop (PC/macOS) or Mobile Teams application (Android/iOS) or dedicated Teams Desktop Phones. We are using redundant Microsoft validated SBC (Session Border Controller) from Audiocodes to integrate Microsoft Cloud with VTX Telephony platform, and we did automatize the integration to allow flexibility for our partners and customers. As a consequence, no telephony trunk setup is needed on your side.
- Please order a VTX Teams Connect service using https://www.vtx.ch/fr/corporate/telephonie/teams-connect or https://www.vtx.ch/de/corporate/telephonie/teams-connect
- You will get a Kiosk account VTX Kiosk interface account from which you will be able to manage and setup your service
A Microsoft 365 domain and accounts[edit | edit source]
- A Microsoft 365 domain and account : You need to have or order a Microsoft 365 account from https://www.microsoft.com/en-us/microsoft-365/business
- That will include a Microsoft domain for your enterprise like enterprise.onmicrosoft.com ( or your own enterprise internet name if by example you migrated your emails to Microsoft )
- A Microsoft 365 Admin account that will be able to buy and affect licenses to your users
- A Microsoft 365 Domain provided by VTX when you subscribe to VTX Teams Connect service like <servicenumber>.teams.ipvoip.ch ( ex: 123456.teams.ipvoip.ch visible in Kiosk )
- To integrate this domain on your account, you can enable it from your Kiosk Interface, cf VoIP:VTX_Teams_Connect#Link_your_.3CSERVICE_NUMBER.3E.teams.ipvoip.ch_Domain_between_Microsoft_and_VTX_Telephony_platform below
- This domain will be used by "VTX Teams Connect" service to bridge Microsoft Teams Cloud with VTX VoIP platform using
- A Microsoft 365 admin account with at least the following right (Usually the one used by partner or IT to create user and assign license. Please use "Show all by category" button to see them)
- Skype For Business Admin Admin right
- Teams admin Admin right
- Teams communication Admin Admin right
- Teams communication support engineer Admin right
- Teams communication support specialist Admin right
- User Admin Admin right ( to be able to create users)
- License Admin Admin right (to assign licenses)
- A Microsoft 365 user account teamsconnect@<servicenumber>.teams.ipvoip.ch ( First Name: "PowerShell" / Last Name : "VTX Teams Connect" / Login : teamsconnect@<servicenumber>.teams.ipvoip.ch / No Admin Right / "Teams" and "Phone System" licenses ). It will be used to enable Teams in <servicenumber>.teams.ipvoip.ch domain and can be deleted once Voice Routing rules have been successfully created
- A Microsoft 365 Phone System license ( Temporarily license to create the routing rules, you can disable the license or use it for another user afterwards )
- The Microsoft Teams App ( Temporarily license to create the routing rules, you can disable the license or use it for another user afterwards )
- For all your users wishing to have a telephone number afterwards
- A "Microsoft Teams" license ( "Microsoft Teams Commercial Cloud" or Microsoft Teams license included in the E1 or E3 or E5 license )
- A "Microsoft 365 Phone System" License for any users that will get a phone number
Microsoft Windows PC/Server with Powershell[edit | edit source]
| Powershell + Skype for Business Online can be used from one of the Microsoft Server or Desktop version listed here https://docs.microsoft.com/en-us/SkypeForBusiness/set-up-your-computer-for-windows-powershell/set-up-your-computer-for-windows-powershell |
- (Powershell) : Install Powershell your PC https://docs.microsoft.com/en-us/powershell/scripting/install/installing-windows-powershell?view=powershell-7
- (Microsoft Visual Studio C++): Install Microsoft Visual Studio C++ 2019 x64 using https://support.microsoft.com/fr-ch/help/2977003/the-latest-supported-visual-c-downloads
- (SkypeOnlineConnector Powershell Module)' Install Windows Powershell Skype for Business Online module
- Follow https://docs.microsoft.com/en-us/SkypeForBusiness/set-up-your-computer-for-windows-powershell/set-up-your-computer-for-windows-powershell
- Install Windows Powershell module Skype for Business Online module: https://www.microsoft.com/en-us/download/details.aspx?id=39366
Import SkypeOnlineConnector Powershell module
 PS C:\WINDOWS\system32> Import-Module SkypeOnlineConnector
 PS C:\WINDOWS\system32>
VTX Teams Connect Kiosk Management[edit | edit source]
Link your <SERVICE_NUMBER>.teams.ipvoip.ch Domain between Microsoft and VTX Telephony platform[edit | edit source]
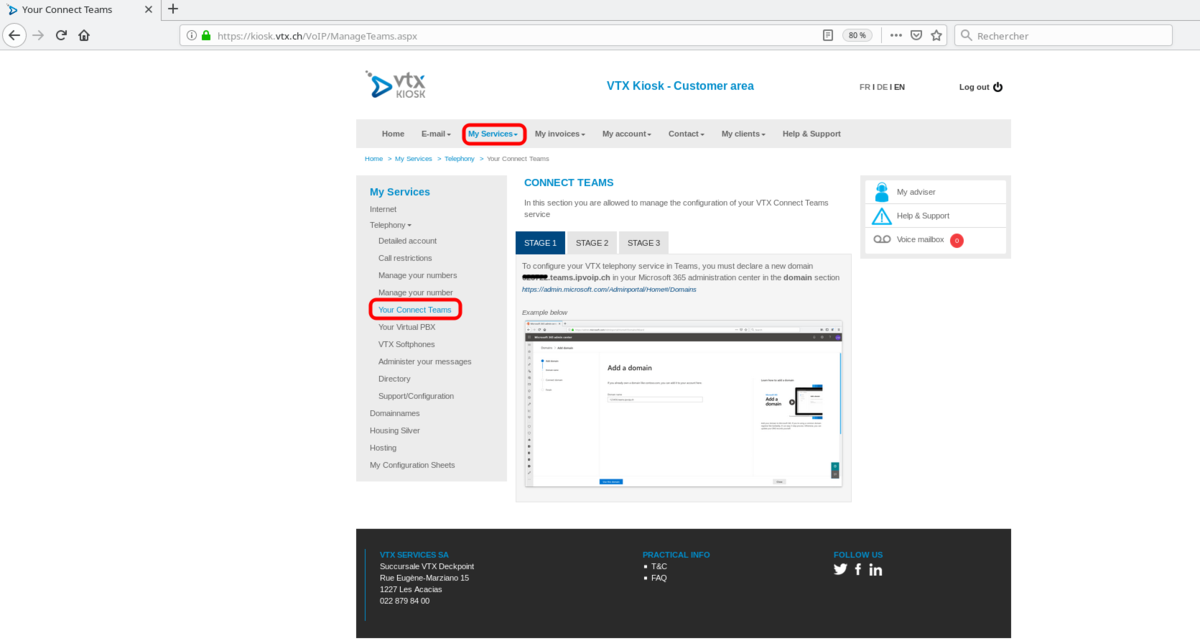
- Connect to https://kiosk.vtx.ch/VoIP/ManageTeams.aspx and follow the helper. You will declare the domain provided by VTX and link it to your Microsoft account
Microsoft Teams Management[edit | edit source]
Connect to Microsoft 365 Admin Portal[edit | edit source]
| You can use this interfaces for the Domain Management, User management, License management and Software Management |
- Main URL : https://admin.microsoft.com/
- Domain Management URL: https://admin.microsoft.com/Adminportal/Home#/Domains
- User Management URL: https://admin.microsoft.com/Adminportal/Home#/users
Voice Routing : Create Voice Routing to allow your users to use VTX Teams Connect[edit | edit source]
| You will only need to do this once at service setup, then it is not needed anymore |
| It will take several hours for Microsoft to create your domain after linking it in the Kiosk, so it is wise to wait a few hours before trying to create the routing. If it is not ready, you won't be able to login or Voice Routing will not work. So you will need to be really patient. |
Now you will need to setup a routing plan. You can use one of the following options to do it
- Using a Powershell Script that will ask you questions
- Manually in Powershell
Create Voice Routing using a VTX Powershell Script VTX_Connect_Teams_Create_Routing_Rules.ps1[edit | edit source]
| By default for security reason, it is not allowed to execute a powershell script downloaded on the internet, that is why you will need to open them with Wordpad to check what it does, save it and execute it afterwards |
- Download https://wiki.vtx.ch/media/VTX_Connect_Teams_Create_Routing_Rules.ps1 on your computer ( Right Click on the link / Download )
- Open it with Wordpad and use Ctrl-s to save it again ( to inform the system that it is local script )
- Execute it on your PC : It will ask you for these parameters and create the routing
- VTX Teams Connect Domain : ex: 123456.teams.ipvoip.ch
- Your MS Teams Admin Credentials : ex: admin@COMPANY.onmicrosoft.com
Or Create Voice Routing manually in Powershell Command Prompt[edit | edit source]
| If you prefer a manual setup, perform the following actions |
- Open a powershell prompt on your PC
- Copy paste command below one by one changing the values in bold with your own
# Set Variables
$MSTeamsDomain = "123456.teams.ipvoip.ch"
$MSteamsAdminUser = "admin@COMPANY.onmicrosoft.com"
# Connect to Microsoft Teams management and create all Voice Routing
$Session = New-CsOnlineSession -UserName $MSteamsAdminUser
Import-PSSession $Session -AllowClobber
Set-CsOnlinePstnUsage -Identity Global -Usage @{Add="CsOnlinePstnUsage-$MSTeamsDomain"}
New-CsOnlineVoiceRoute -Identity "CsOnlineVoiceRoute-$MSTeamsDomain" -Priority 0 -NumberPattern '.*' -OnlinePstnGatewayList "$MSTeamsDomain" -OnlinePstnUsages "CsOnlinePstnUsage-$MSTeamsDomain"
New-CsOnlineVoiceRoutingPolicy -Identity "CsOnlineVoiceRoutingPolicy-$MSTeamsDomain" -OnlinePstnUsages "CsOnlinePstnUsage-$MSTeamsDomain"
Set-CsCallingLineIdentity -Identity Global -EnableUserOverride $True

# Verify all setup ( You can compare it with the Debug Section in the wiki )
Get-CsOnlinePstnUsage
Get-CsOnlineVoiceRoute
Get-CsOnlineVoiceRoutingPolicy
Get-CsCallingLineIdentity

# Logout
Get-PSSession | Remove-PSSession
Number Mapping : Assign numbers to Microsoft accounts[edit | edit source]
Now you will need to assign a number and a routing plan to each user with a "Microsoft 365 Phone System" license. You can use one of the following options to do it
- Using a Powershell Script that will ask you questions
- Manually in Powershell
Assign numbers using a VTX Powershell Script VTX_Connect_Teams_Assign_Numbers.ps1[edit | edit source]
| By default for security reason, it is not allowed to execute a powershell script downloaded on the internet, that is why you will need to open them with Wordpad to check what it does, save it and execute it afterwards |
- Download https://wiki.vtx.ch/media/VTX_Connect_Teams_Assign_Numbers.ps1 on your computer ( Right Click on the link / Download )
- Open it with Wordpad and use Ctrl-s to save it again ( to inform the system that it is local script )
- Execute it on your PC : It will ask you for these parameters and create the routing
- VTX Teams Connect Domain : ex: 123456.teams.ipvoip.ch
- Your MS Admin Credentials for : ex: admin@MSDOMAIN.onmicrosoft.com
- The MS Team user email : ex: first.last@MSDOMAIN.onmicrosoft.com
- The Telephone number you wish to set : ex: +41225661234
Or Assign numbers manually in Powershell Command Prompt[edit | edit source]
| If you prefer a manual setup, perform the following actions |
- Open a powershell prompt on your PC
- Copy paste command below one by one changing the values in bold with your own
# Set Variables
$MSTeamsDomain = "123456.teams.ipvoip.ch"
$MSteamsAdminUser = "admin@MSDOMAIN.onmicrosoft.com"
$MSTeamsUserEmail = "first.last@MSDOMAIN.onmicrosoft.com"
$MSTeamsUserNumber = "+41215661234"
# Connect to Microsoft Teams management
# Connect to Microsoft Teams management and assign number and profile to the user
$Session = New-CsOnlineSession -UserName $MSteamsAdminUser
Import-PSSession $Session -AllowClobber
# Assign a number to your user and the Call Routing
Get-CsOnlineUser -Identity $MSTeamsUserEmail | Set-CsUser -EnterpriseVoiceEnabled $true -OnPremLineURI "tel:$MSTeamsUserNumber"
Get-CsOnlineUser -Identity $MSTeamsUserEmail | Grant-CsOnlineVoiceRoutingPolicy -PolicyName "CsOnlineVoiceRoutingPolicy-$MSTeamsDomain"
# Verify your setup
Get-CsOnlineUser -Identity $MSTeamsUserEmail | Select EnterpriseVoiceEnabled,OnPremLineURI,OnlineVoiceRoutingPolicy,RegistrarPool | Format-List
# List all users with EnterPrise Voice Enabled
Get-CsOnlineUser ` -Filter {(enterprisevoiceenabled -eq $true) -and(HostingProvider -eq "sipfed.online.lync.com")} ` | Select sipaddress,HostedVoicemailPolicy,OnlineVoiceRoutingPolicy,lineuri,OnPremLineURI,RegistrarPool | Format-List
# Logout
Get-PSSession | Remove-PSSession
Dismantle the Service[edit | edit source]
Delete Voice Routing[edit | edit source]
Here are the commands you can use to delete the Voice Routing if you wish to migrate service somewhere else
| You will only be able to delete these entries if no user is using the CsOnlineVoiceRoutingPolicy |
- Open a powershell prompt on your PC
- Copy paste command below one by one changing the values in bold with your own
# Set Variables
$MSTeamsDomain = "123456.teams.ipvoip.ch"
$MSteamsAdminUser = "admin@COMPANY.onmicrosoft.com"
# Connect to Microsoft Teams management and create all Voice Routing
$Session = New-CsOnlineSession -UserName $MSteamsAdminUser
Import-PSSession $Session -AllowClobber

# Delete the Voice Routing
Remove-CsOnlineVoiceRoute -Identity "CsOnlineVoiceRoute-$MSTeamsDomain"
Remove-CsOnlineVoiceRoutingPolicy -Identity "CsOnlineVoiceRoutingPolicy-$MSTeamsDomain"
Set-CsOnlinePstnUsage -Identity Global -Usage @{Remove="CsOnlinePstnUsage-$MSTeamsDomain"}

# Logout
Get-PSSession | Remove-PSSession
Debug[edit | edit source]
| We remind you that for the time being, each actions takes several hours to be in production, so you need to be really patient and follow the steps above one by one |
Start powershell script in Command Line to be able to see the errors[edit | edit source]
- Problem: If you enter wrong credentials, or wrong domain, or if the domain or user is not yet ready on Microsoft side, you might get an error that disappears too quickly
- Solution: use the powershell -File file.ps1 command to be able to see the errors
- Start a "cmd" ( Start menu and enter "cmd" + Enter to display the Black Window
- Use the command powershell -File file.ps1 ( replacing file.ps1 with the correct path of the ps1 file )
Microsoft Windows [Version 6.3.9600]
(c) 2013 Microsoft Corporation. All rights reserved.

H:\>c:

C:\>powershell -File "C:Users\bob\Desktop\VTX_Connect_Teams_Create_Routing_Rules
.ps1"
VTX Teams Connect domain name is XXXX.teams.ipvoip.ch
VTX Teams Admin Username is vtxadmin@XXXX.teams.ipvoip.ch
Connecting to Microsoft Online Management with the credentials you provided
Get-CsOnlinePowerShellEndpoint : The remote name could not be resolved:
'lyncdiscover.xxxx.teams.ipvoip.ch'
At C:\Program Files\Common Files\Skype for Business
Online\Modules\SkypeOnlineConnector\SkypeOnlineConnectorStartup.psm1:149
char:26
+ ... targetUri = Get-CsOnlinePowerShellEndpoint -TargetDomain $adminDomain ...
+                 ~~~~~~~~~~~~~~~~~~~~~~~~~~~~~~~~~~~~~~~~~~~~~~~~~~~~~~~~~
    + CategoryInfo          : NotSpecified: (:) [Get-CsOnlinePowerShellEndpoin
   t], WebException
    + FullyQualifiedErrorId : System.Net.WebException,Microsoft.Rtc.Management
   .OnlineConnector.GetPowerShellEndpointCmdlet


C:\>powershell -File "C:Users\bob\Desktop\VTX_Connect_Teams_Create_Routing_Rules
.ps1"
Verify Voice Routing[edit | edit source]
To verify Voice Routing, you can either use Powershell command lines or check from Admin Teams Web interface in the following 2 sections
Verify Voice Routing using Powershell[edit | edit source]
PS H:\> Get-CsOnlinePstnUsage
Identity : Global
Usage    : {CsOnlinePstnUsage-123456.teams.ipvoip.ch}
PS H:\> Get-CsOnlineVoiceRoute

Identity              : CsOnlineVoiceRoute-123456.teams.ipvoip.ch
Priority              : 0
Description           :
NumberPattern         : .*
OnlinePstnUsages      : {CsOnlinePstnUsage-123456.teams.ipvoip.ch}
OnlinePstnGatewayList : {123456.teams.ipvoip.ch}
Name                  : CsOnlineVoiceRoute-123456.teams.ipvoip.ch
PS H:\> Get-CsOnlineVoiceRoutingPolicy

Identity         : Global
OnlinePstnUsages : {}
Description      :
RouteType        : BYOT

Identity         : Tag:CsOnlineVoiceRoutingPolicy-123456.teams.ipvoip.ch
OnlinePstnUsages : {CsOnlinePstnUsage-123456.teams.ipvoip.ch}
Description      :
RouteType        : BYOT
PS H:\> Get-CsCallingLineIdentity

Identity                  : Global
Description               :
EnableUserOverride        : True
ServiceNumber             :
CallingIDSubstitute       : LineUri
BlockIncomingPstnCallerID : False
Verify Voice Routing using Teams Admin Web Interface[edit | edit source]
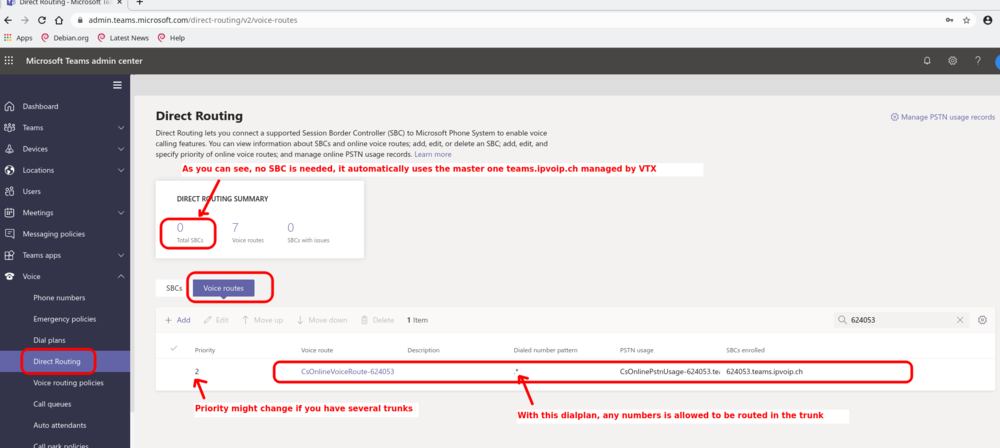
- Verify Voice Routing Rule
- Connect to https://admin.teams.microsoft.com/direct-routing/v2/voice-routes and verify the routing rule (cf screenshot)
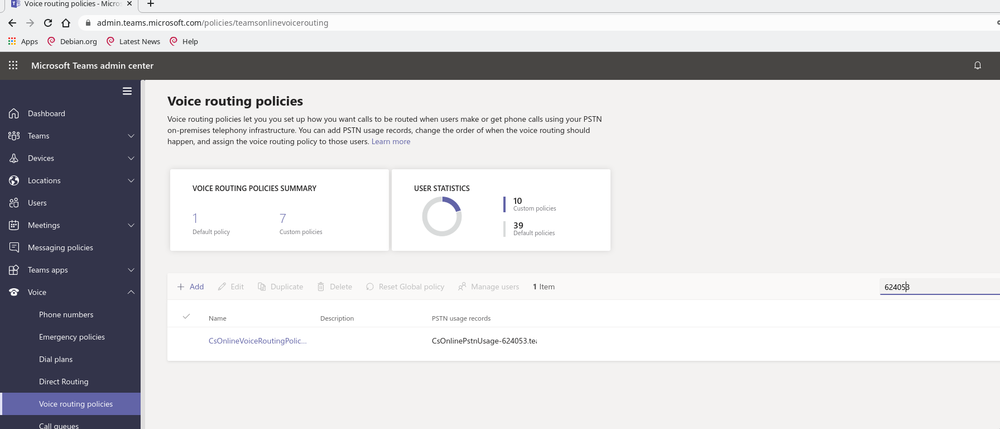
- Verify Voice Routing Policy
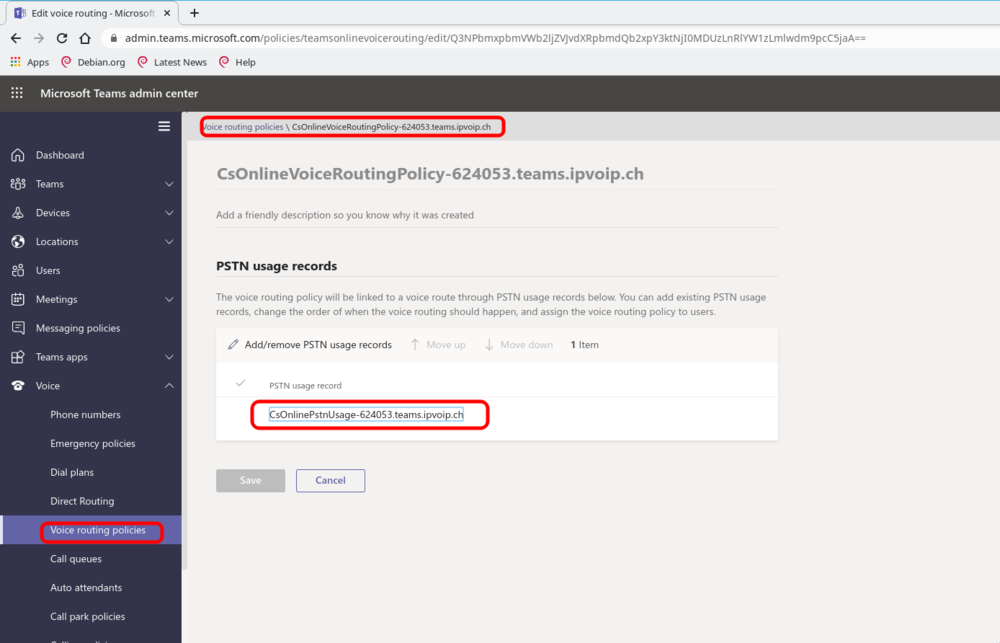
- Connect to https://admin.teams.microsoft.com/policies/teamsonlinevoicerouting and verify Voice Routing policy (cf screenshot )
- Name should be CsOnlineVoiceRoutingPolicy-<service_nummber>.teams.ipvoip.ch
- PSTN Usage Record should be CsOnlinePstnUsage-<service_nummber>.teams.ipvoip.ch
Verify User Setup[edit | edit source]
To verify User setup, you can either use Powershell command lines or check from Admin Teams Web interface in the following 2 sections
Verify User setup using Powershell[edit | edit source]
| You can use these powershell commands too verify all your users do have a valid MS Teams license enabled ( that enables EnterpriseVoiceEnabled ) and also have the correct OnlineVoiceRoutingPolicy |
# Set Variables
$MSTeamsDomain = "123456.teams.ipvoip.ch"
$MSteamsAdminUser = "admin@COMPANY.onmicrosoft.com"

# Connect to Microsoft Teams management and assign number and profile to the user
$Session = New-CsOnlineSession -UserName $MSteamsAdminUser
Import-PSSession $Session -AllowClobber
# Verify all users with correct setup using CsOnlineVoiceRoutingPolicy-$MSTeamsDomain
Get-CsOnlineUser ` -Filter {(enterprisevoiceenabled -eq $true) -and(HostingProvider -eq "sipfed.online.lync.com")} ` |  Select EnterpriseVoiceEnabled,sipaddress,OnPremLineURI,OnlineVoiceRoutingPolicy,RegistrarPool | Format-List

EnterpriseVoiceEnabled   : True
SipAddress               : sip:user1@myoffice.onmicrosoft.com
OnPremLineURI            : tel:+41215660011
OnlineVoiceRoutingPolicy : CsOnlineVoiceRoutingPolicy-123456.teams.ipvoip.ch
RegistrarPool            : sippoolAM42E08.infra.lync.com

EnterpriseVoiceEnabled   : True
SipAddress               : sip:user2@myoffice.onmicrosoft.com
OnPremLineURI            : tel:+41215660012
OnlineVoiceRoutingPolicy : CsOnlineVoiceRoutingPolicy-123456.teams.ipvoip.ch
RegistrarPool            : sippoolAM42E08.infra.lync.com

EnterpriseVoiceEnabled   : True
SipAddress               : sip:user3@myoffice.onmicrosoft.com
OnPremLineURI            : tel:+41215660013
OnlineVoiceRoutingPolicy : CsOnlineVoiceRoutingPolicy-123456.teams.ipvoip.ch
RegistrarPool            : sippoolAM42E08.infra.lync.com

# Logout
Get-PSSession | Remove-PSSession
Verify User setup using Teams Admin Web Interface[edit | edit source]
- Verify user licenses
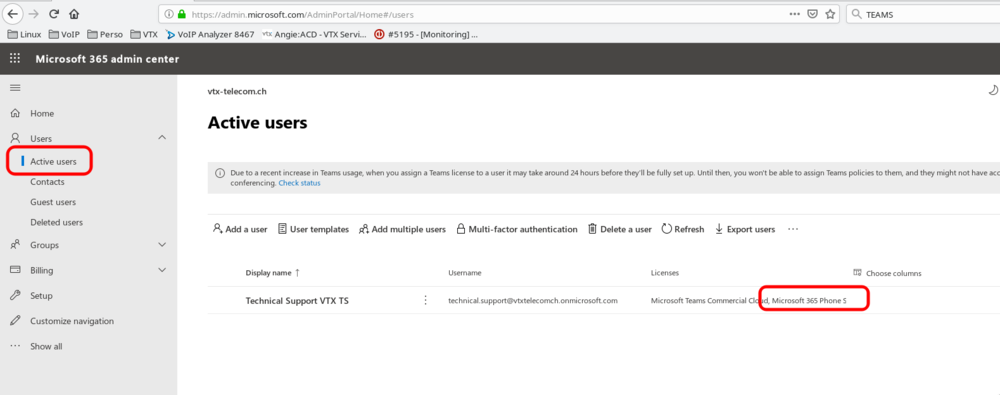
- Connect to https://admin.microsoft.com/AdminPortal/Home#/users and verify that your user does have a "Microsoft Teams" license and a "Microsoft 365 Phone System" license
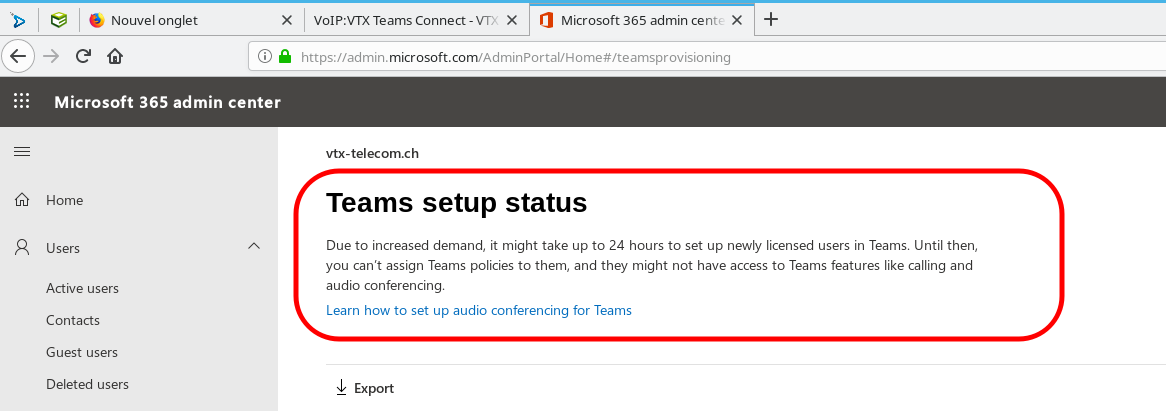
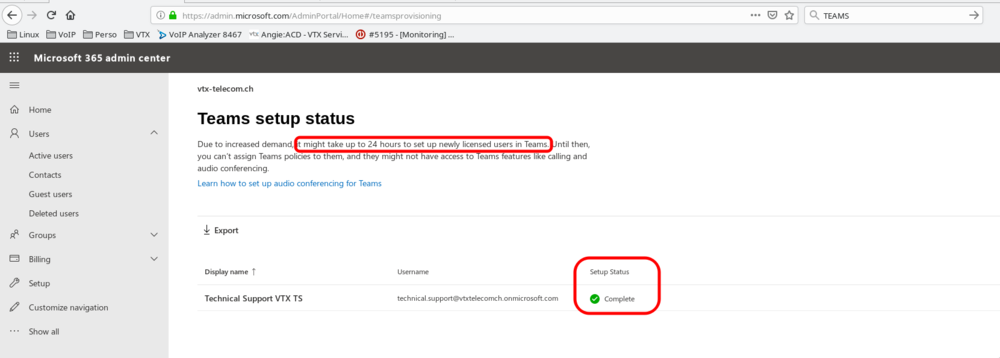
- Verify in https://admin.microsoft.com/AdminPortal/Home#/teamsprovisioning that your user Teams license provisioning is finished ( it can take several hours )
- Verify user number
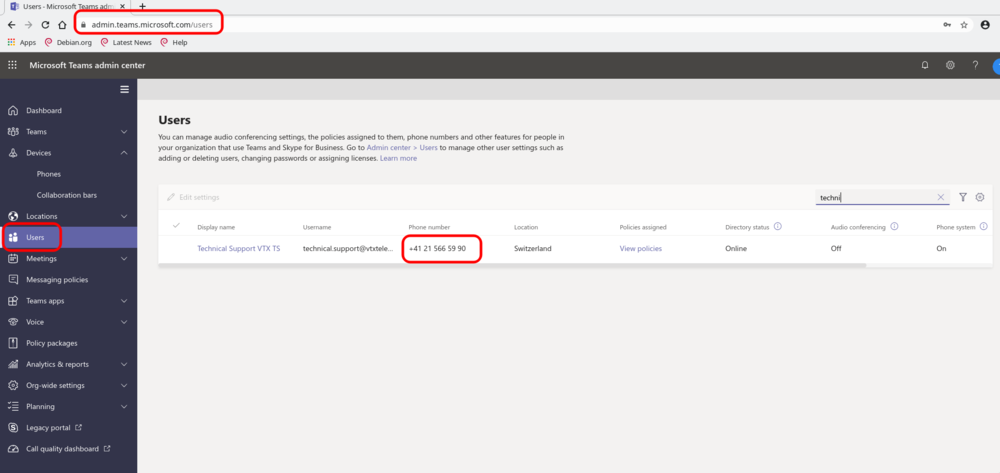
- Connect to https://admin.teams.microsoft.com/users and verify that "Phone Number" has been correctly setup via powershell
- Verify user routing rules
- Connect to https://admin.teams.microsoft.com/user and select your user
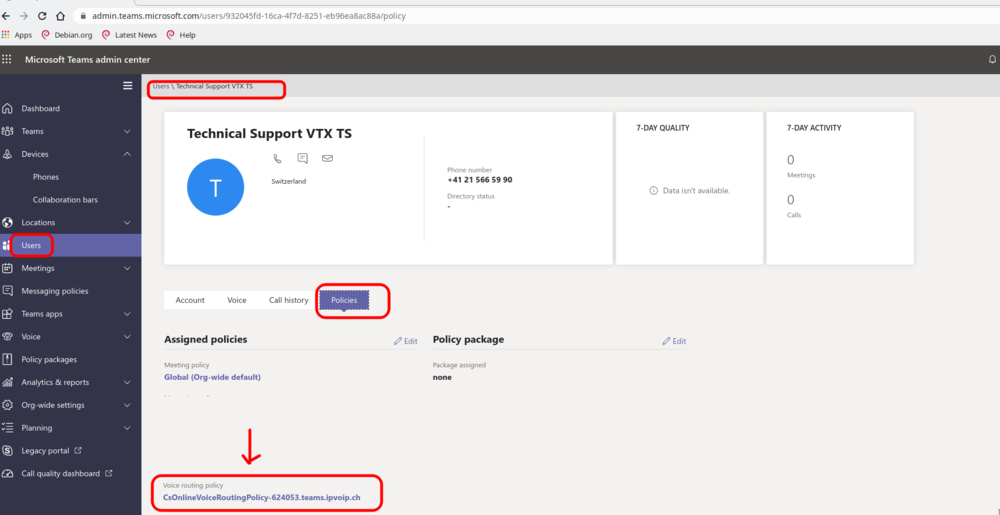
- Go in the Policies tab section and look at the last entry "Voice routing policy", is should be CsOnlineVoiceRoutingPolicy-<service_number>.teams.ipvoip.ch
Microsoft Teams App - New Icon and number displayed[edit | edit source]
| Once the license and numbers have been assigned to a user, you will need to wait between a few minutes and 24h depending on Microsoft Teams latency until being able to have the new Call Icon and being able to use your number |
- Enable the needed license ( Teams + Phone System )
- Assign the number to the desired user
- Wait for some time
- You will see a new Call icon + the user number on the app
- (Mobile) You might get a popup informing that you have a new license and that app needs to be restarted
- (PC) Restart is not supposed to be needed, if you have waited a long time, please try to exit the app and start it back
- Now you can start calling using your VTX "Connect Teams" service


