Cloud:Hosted Exchange
From VTX Public Wiki
Hosted Exchange[edit | edit source]
Collaborative, flexible, multi-platform professional messaging, personalized on your domain names.
VTX Hosted Exchange provides a reliable and secure email service without the need to invest in hardware. With the intuitive administration interface, you can easily manage users.
DNS record Exchange service[edit | edit source]
In order for the Exchange service to function correctly, the MX records of your domain name must be changed, you can also create a CNAME record for autodiscover (automatic configuration) and a TXT record to use the VTX SPF.
If the DNS zone of your domain is hosted by VTX, we can make the necessary changes, but if it is hosted elsewhere, please contact your IT specialist so that the changes can be made.
MX
- mx1.business-exchange.ch (priorité de 10)
- mx2.business-exchange.ch (priorité de 20)
CNAME
- autodiscover.[domain.tld] CNAME autodiscover-redirect.business-exchange.ch
Note: Please replace "[domain.tld]" with your own domain name.
TXT (SPF)
- "v=spf1 a mx include:spf.vtx.ch ~all"
Note: Quotation marks must be included in the TXT record
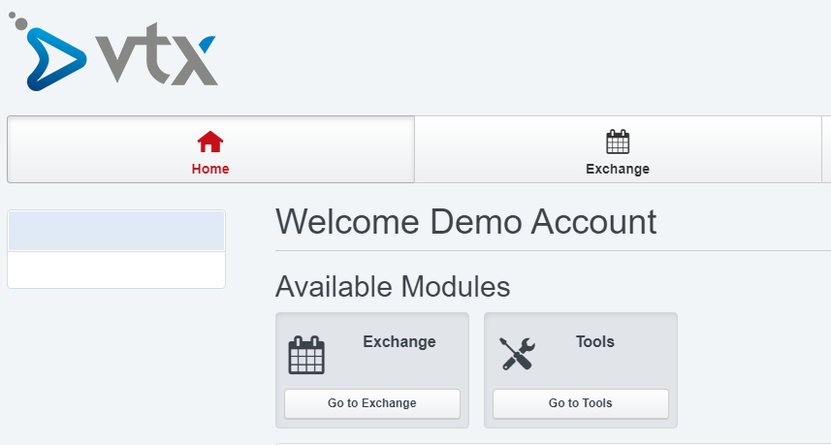
Connecting to the control panel[edit | edit source]
You can access to the login page of the control panel with the following link: https://hex.vtx.ch/login/
To log in, please use the logins that have been sent to you by email from VTX, once logged in you will have access to the management of your Exchange service.
Main control panel page:
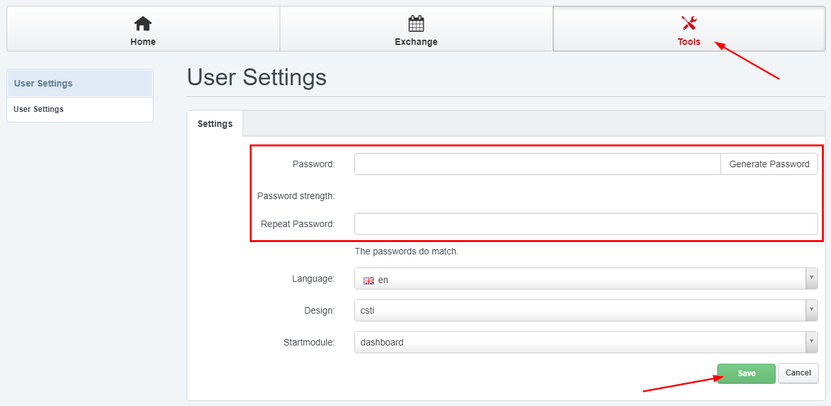
Change control panel password[edit | edit source]
Here is the procedure to change the password of your control panel.
- Once logged in, click on the Tools menu
- Put your new password in the Password text field and confirm it in the Repeat Password text field
- Click on the Save button
Note: If you wish, you can also change the language of the control panel via the Language drop-down list
Login to the Exchange OWA[edit | edit source]
You can connect to your inbox through the OWA (Outlook Web App) of the Exchange service with the following link: http://mail.business-exchange.ch/
Note: It is possible that the login differs from the name of your email address. To check this, you can connect to the control panel of your Exchange service, then click on the menu Exchange then on Users List on the left. On the new page, click on the user who wishes to connect to the OWA and then go to the "Exchange" tab. A text field Address Email is present, indicating the email address of the Exchange user then underneath is the text field Login Account, this usually corresponds to the email address but can be different, if so this is the login that should be used to connect to the OWA, the password is that of the email address.
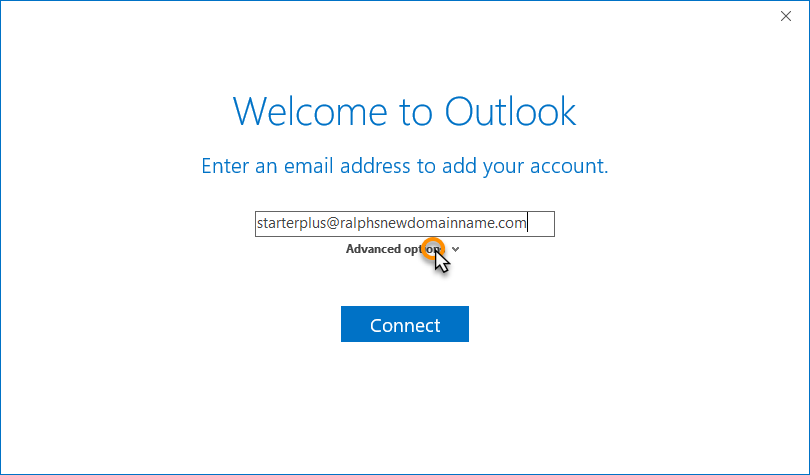
Setting up an email account in Outlook 2019[edit | edit source]
Thanks to the Exchange autodiscover, you can easily configure your account on Outlook. The procedure indicated here was done on Outlook 2019, however it is the same for the previous versions.
- From Outlook, go to the File tab and click on the + Add account button
- Then put the login of your email address (usually the same as the email address in question, if needed this can be checked from the control panel) in the text field and then click on the button Connect.
Note:' It is possible that the login differs from the name of your email address, to check this point, you can connect to the control panel of your Exchange service, then click on the Exchange menu then on Users List on the left. On the new page, click on the user who wishes to configure his mail account on Outlook and then go to the tab Exchange. A text field Address Email is present, indicating the email address of the Exchange user then underneath is the text field Login Account, this generally corresponds to the email address but can be different,if necessary it is this login that should be used to connect the mail account on Outlook, the password is the one used for the mail address.
- Outlook will then start the configuration. After a few seconds, the password of your Exchange account will be asked, enter it, check the box Remember my credentials then click on the button OK
- Outlook will then confirm that the account has been added and configured, a restart of the account is necessary to finalize the configuration
Your account should now be set up and ready to use, click OK to close the wizard. Outlook 2019 is now configured to send and receive email through your mailbox.
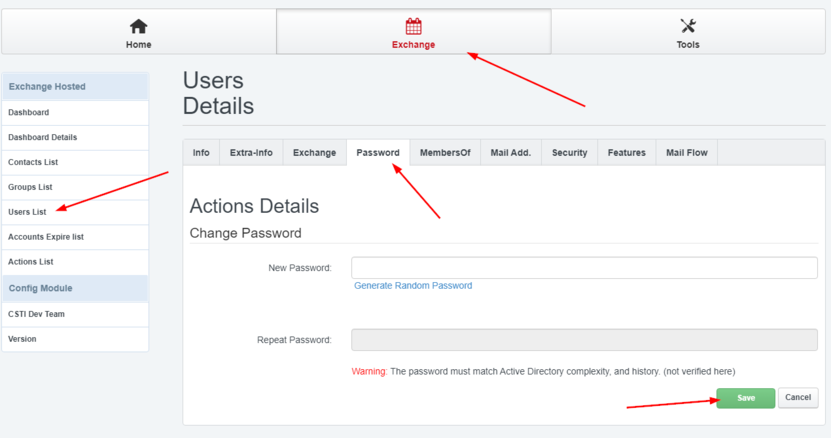
Change the password of an Exchange account[edit | edit source]
It is possible to change the password of an Exchange mail account from the control panel, once connected to it:
- Click on the Exchange button and then on Users List on the left menu
- Click on the name of the Exchange user whose password you wish to change
- Go to the Password tab
Here you have the option to change the password without changing the current one. The new password must respect the complexity standards of the Microsoft Active Directory. Once the new password is entered, click on the Save button to save the changes.
Controlling the quotas of an Exchange account[edit | edit source]
By default, each Exchange mail account has 25GB of storage space. Storage usage can be monitored on the control panel of your Exchange service.
Once you are logged into your control panel, click on the Exchange menu and then on the Users List. Click on the user whose storage space you wish to control and then click on the Exchange tab
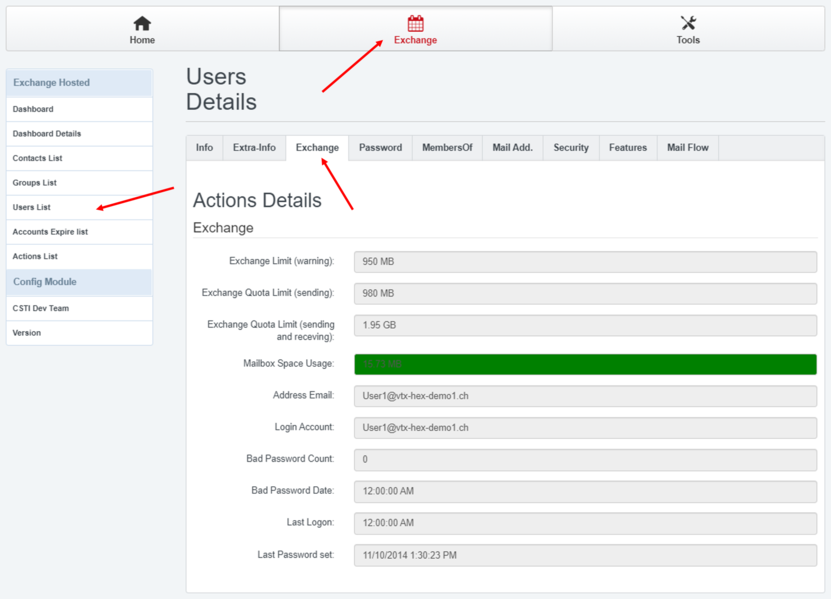
There are 4 text fields that indicate usage:
- Exchange Limit (warning): Indicates the amount of storage space that the Exchange server informs you about the fill rate. Values in MB (megabytes)
- Exchange Quota Limit (sending): Indicates up to which amount of storage space used you can continue to send e-mails. Value in MB
- Exchange Quota Limit (sending and receiving): Specifies the quota of your e-mail address, if this limit is reached you will not be able to send/receive e-mails. Value in MB (megabytes)
- Mailbox Space Usage: Indicates the storage space currently used on your e-mail address, indicated in kB (kB). In MB, e.g. 1024kB = ~100MB. Value in MB (megabytes)
Adding a new mailbox[edit | edit source]
From the Exchange service control panel it is possible to create a new mailbox.
To create it, login to the control panel and then:
- Click on the Exchange button and then on Users List on the left menu
- Click on the Add new record
- Put the information in the text fields. Once this is done, click on the Save button

Adding an alias to an email address[edit | edit source]
From the Exchange service control panel it is possible to create an alias for an email address, so any emails sent to this alias will be delivered to the original Exchange user's inbox.
To create an alias, login to the control panel and then:
- Click on the Exchange button and then on Users List on the left menu
- Select the user you wish to add an alias for by clicking on the user's name
- Then go to the Mail Add. tab
- Put the alias in the text field New Email Address. Once this is done, click on the Save button
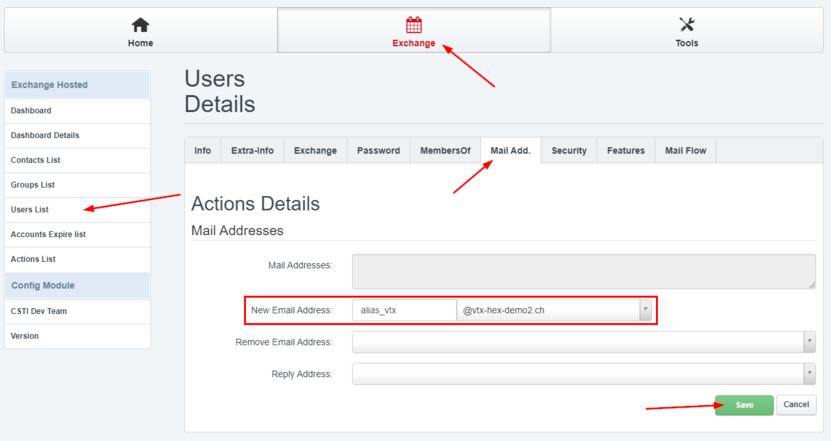
If you then go back to the user settings and click on the Mail Add. tab, you will see in the Mail Addresses text field the alias as well as the email address that should be used to reply to emails (reply address).
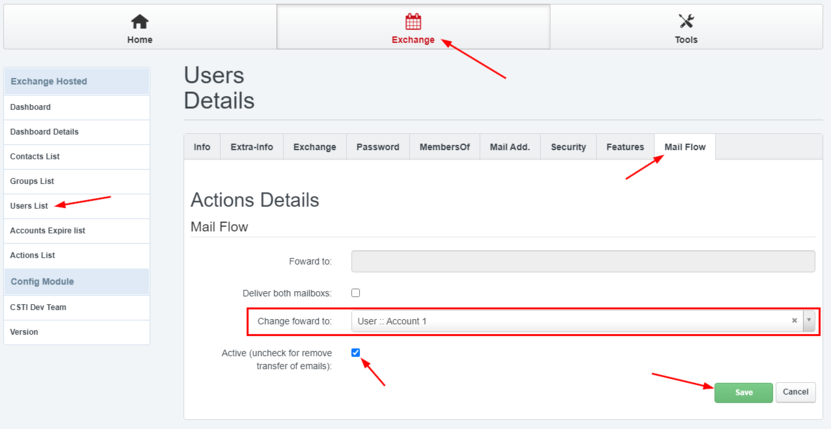
Add a forwardTo or copyTo to an email address[edit | edit source]
You can add a forwardTo or a copyTo to an Exchange user from the control panel. Once connected on this one:
- Click on the Exchange button then on Users List on the left menu
- Then click on the Mail Flow tab
- If you wish to set up a forwardTo, do not check the box Deliver both mailboxes, if you wish to activate a copyTo, check it.
- Change forward to: Select here the Exchange user to whom you want to forward / send a copy of the emails
- Active: Check the box Active (uncheck for remove transfer of emails) to activate the rule.
- Once the settings are entered, click on the Save button
Related Products[edit | edit source]

|

|

|
| Veeam Backup for IaaS | Managed Cloud Server | Web Cloud Server |
| The enterprise cloud backup solution by VTX | Your critical applications on ahigh-availability virtual server | Host your websites on a virtual server optimised for the Web! |