VoIP:VTX VPBX Teams Presence Synchronisation: Difference between revisions
From VTX Public Wiki
(→API Permissions - All access to Presence Information in Read/Write mode: Add red color, it is different) |
(Rich Presence Mapping Teams / VoIP Platform) |
||
| Line 4: | Line 4: | ||
= |
=Introduction= |
||
* |
*'''History''': Since the upgrade of VTX VoIP platform to version 7 in late 2022, VTX VoIP platform does have an OpenAPI interface that allows to interact with other external tools. An a dedicated integrated framework has been developed to easily sync VTX and Teams Rich Presence |
||
* |
*'''How it works''': We do have VTX and Teams APIs talking to each other to exchange real time information about presence status. A restricted API account needs to be created on both platforms to have them being able to talk to each other. Then, we only have to link each VPBX user with his Teams Email address to start the presence sync. |
||
* |
*'''What does it do''' : Sync VTX/Teams Rich Presence status in real time. Allowing not to be bothered by a Teams Call when on a "normal" VoIP call, or the other way around. Here are a few simple use cases |
||
# '''Teams->C5''': Be visible as "presenting" on VoIP platform while sharing screen in a Teams Call |
|||
# '''Teams->C5''': Be visible as "in a meeting" on VoIP plarform while in a Teams Meeting in calendar |
|||
# '''C5->Teams''': Be seen as busy in Teams while on the "normal" phone |
|||
#'''Teams->C5''': Be visible as "presenting" on VoIP platform while sharing screen in a Teams Call |
|||
#'''Teams->C5''': Be visible as "in a meeting" on VoIP plarform while in a Teams Meeting in calendar |
|||
#'''C5->Teams''': Be seen as busy in Teams while on the "normal" phone |
|||
== |
==Setup Process Overview== |
||
Here is the process that will allow you to setup the service |
Here is the process that will allow you to setup the service |
||
# |
#Follow requirements below [[{{FULLPAGENAME}}#Requirements]] |
||
# |
#Perform Azure AD setup ( create Application + API User + Certificate ) |
||
# |
#Perform VTX C5 Setup ( Link Credentials + Certificate) |
||
# |
#Setup VTX/Teams User mapping |
||
=="VTX VPBX Teams Presence Synchronisation" value added features== |
|||
*'''Sync Rich Presence Status between VTX VPBX and MS Teams''' to benefit from both world without being visible as available when it is not the case |
|||
== "VTX VPBX Teams Presence Synchronisation" value added features == |
|||
* '''Sync Rich Presence Status between VTX VPBX and MS Teams''' to benefit from both world without being visible as available when it is not the case |
|||
=Requirements= |
|||
= Requirements = |
|||
You will find below all the needed requirements to use '''VTX VPBX Teams Presence Synchronisation''' Service |
You will find below all the needed requirements to use '''VTX VPBX Teams Presence Synchronisation''' Service |
||
# a VTX VPBX Service |
|||
# A '''Microsoft 365''' domain and accounts |
|||
# A '''Microsoft Azure Portal''' Admin account |
|||
#a VTX VPBX Service |
|||
#A '''Microsoft 365''' domain and accounts |
|||
#A '''Microsoft Azure Portal''' Admin account |
|||
=Azure AD Setup Part 1= |
|||
= Azure AD Setup Part 1 = |
|||
==Create an Azure App Registration== |
|||
== Create an Azure App Registration == |
|||
*'''Problematic''': We would like to create an Azure App Registration named "VTX MS365 Presence Sync" to sync VoIP Platform and Azure ( that we will restrict to presence status sync only afterwards) |
|||
*'''Solution''': Follow procedure below |
|||
#Connect to https://portal.azure.com/ with an Admin Account of the domain you wish to sync presence status with the VoIP platform |
|||
* '''Problematic''': We would like to create an Azure App Registration named "VTX MS365 Presence Sync" to sync VoIP Platform and Azure ( that we will restrict to presence status sync only afterwards) |
|||
#Select the "Azure Active Directory" service in the list ( if not visible, click on the "More service" option or search for it ) |
|||
* '''Solution''': Follow procedure below |
|||
#Open the "App registrations" and create a new Registration in https://portal.azure.com/#view/Microsoft_AAD_IAM/ActiveDirectoryMenuBlade/~/RegisteredApps |
|||
# Connect to https://portal.azure.com/ with an Admin Account of the domain you wish to sync presence status with the VoIP platform |
|||
##Name = "VTX MS365 Presence Sync c<'''CUSTOMERNUMBER'''>" ( ex: "VTX MS365 Presence Sync c429080" because 429080 is my VTX Test customer number) |
|||
# Select the "Azure Active Directory" service in the list ( if not visible, click on the "More service" option or search for it ) |
|||
##Set App as "Single tenant" access |
|||
# Open the "App registrations" and create a new Registration in https://portal.azure.com/#view/Microsoft_AAD_IAM/ActiveDirectoryMenuBlade/~/RegisteredApps |
|||
##Click the "Register" button |
|||
## Name = "VTX MS365 Presence Sync c<'''CUSTOMERNUMBER'''>" ( ex: "VTX MS365 Presence Sync c429080" because 429080 is my VTX Test customer number) |
|||
#Copy the value of '''"Directory (tenant) ID"''' in a notepad that will be required later (info n°1) |
|||
## Set App as "Single tenant" access |
|||
#Copy the value of '''"Application (client) ID"''' in a notepad that will be required later (info n°2) |
|||
## Click the "Register" button |
|||
# Copy the value of '''"Directory (tenant) ID"''' in a notepad that will be required later (info n°1) |
|||
# Copy the value of '''"Application (client) ID"''' in a notepad that will be required later (info n°2) |
|||
| Line 71: | Line 72: | ||
== |
==Create a Client Secret== |
||
| Line 78: | Line 79: | ||
* |
*'''Information''': To authenticate an access to the App, we 1st create a "secret" key, we will create a certificate to enhance security even more in next sections |
||
* |
*'''Problematic''': Within the "VTX MS365 Presence Sync" App, create a "Client secret" |
||
* |
*'''Solution''': Follow procedure below |
||
# Within the "VTX MS365 Presence Sync cXXXXX" app, go in the Certificates & secrets menu |
|||
# |
#Within the "VTX MS365 Presence Sync cXXXXX" app, go in the Certificates & secrets menu |
||
#Go in the "Client secrets" Tab |
|||
# Click on "+ New client secret" |
|||
#Click on "+ New client secret" |
|||
## Set '''Description''' = "MS365 Presence Client Secret cXXXXX" |
|||
## |
##Set '''Description''' = "MS365 Presence Client Secret cXXXXX" |
||
##Set '''Expires''' = Maximum 730 days ( 24 months ) |
|||
## Click the "Add" Button |
|||
##Click the "Add" Button |
|||
# Copy now the "Value" of the secret in a notepad and store the value for later use (info n°3) |
|||
# |
#Copy now the "Value" of the secret in a notepad and store the value for later use (info n°3) |
||
#Copy also the expiration date of the secret (info n°4) |
|||
| Line 99: | Line 101: | ||
== |
==Create API user MS365-Presence-Sync-cXXXXX== |
||
* |
*'''Information''': We need to create an API user that does not require any additional license. We set it up with restricted access to only allow bi-directional Rich Presence Sync for this user |
||
* |
*'''Problematic''': Create an API user |
||
* |
*'''Solution''': Follow procedure below |
||
# Connect to Azure Portal user list https://portal.azure.com/#view/Microsoft_AAD_UsersAndTenants/UserManagementMenuBlade/~/AllUsers |
|||
#Connect to Azure Portal user list https://portal.azure.com/#view/Microsoft_AAD_UsersAndTenants/UserManagementMenuBlade/~/AllUsers |
|||
# Click the "+ New user" button |
|||
#Click the "+ New user" button |
|||
## Set '''User name''' = '''MS365-Presence-Sync-cXXXXX @ "YOUR DOMAIN"''' and store information in notepad (info n°5). NB: The "DOMAIN" should be the same as the Teams user you wish to sync presence for |
|||
##Set '''User name''' = '''MS365-Presence-Sync-cXXXXX @ "YOUR DOMAIN"''' and store information in notepad (info n°5). NB: The "DOMAIN" should be the same as the Teams user you wish to sync presence for |
|||
## Set '''Display Name''' = MS365 Presence Sync API User cXXXXX |
|||
##Set '''Display Name''' = MS365 Presence Sync API User cXXXXX |
|||
## Create and Store Complex Password and store information in notepad (info n°6) |
|||
##Create and Store Complex Password and store information in notepad (info n°6) |
|||
## Set the user as "Global Reader" for the time being |
|||
##Set the user as "Global Reader" for the time being |
|||
<table> |
<table> |
||
| Line 122: | Line 125: | ||
== |
==API Authentication - Allow public client flows== |
||
* |
*'''Problematic''': We need to allow public access to the App Registration "VTX MS365 Presence Sync" to be able to access it from the VTX VoIP platform |
||
* |
*'''Solution''': Follow procedure below |
||
# Go back in the app registration https://portal.azure.com/#view/Microsoft_AAD_IAM/ActiveDirectoryMenuBlade/~/RegisteredApps |
|||
#Go back in the app registration https://portal.azure.com/#view/Microsoft_AAD_IAM/ActiveDirectoryMenuBlade/~/RegisteredApps |
|||
# Select "VTX MS365 Presence Sync cXXXXX" app |
|||
#Select "VTX MS365 Presence Sync cXXXXX" app |
|||
# Go in "Authentication" menu |
|||
#Go in "Authentication" menu |
|||
# In "Advanced settings", set "Allow public client flows" = Yes |
|||
#In "Advanced settings", set "Allow public client flows" = Yes |
|||
# Click the "Save" button |
|||
#Click the "Save" button |
|||
<table> |
<table> |
||
| Line 140: | Line 144: | ||
== |
==API Permissions - All access to Presence Information in Read/Write mode== |
||
* |
*'''Problematic''': We need to restrict the app API permissions to Read/Write mode to presence data only |
||
* |
*'''Solution''': Follow procedure below |
||
# Go back in the app registration https://portal.azure.com/#view/Microsoft_AAD_IAM/ActiveDirectoryMenuBlade/~/RegisteredApps |
|||
#Go back in the app registration https://portal.azure.com/#view/Microsoft_AAD_IAM/ActiveDirectoryMenuBlade/~/RegisteredApps |
|||
# Select "VTX MS365 Presence Sync cXXXXX" app |
|||
#Select "VTX MS365 Presence Sync cXXXXX" app |
|||
# Go in the "API permissions" menu |
|||
#Go in the "API permissions" menu |
|||
# Delete the "User.Read" default permission that is not needed |
|||
# |
#Delete the "User.Read" default permission that is not needed |
||
#Click the "Add a permission" button |
|||
## Select "Microsoft Graph" |
|||
##Select "Microsoft Graph" |
|||
## '''Select <font color="red">"Delegated permissions"</font>''' |
|||
##'''Select <font color="red">"Delegated permissions"</font>''' |
|||
## Search and enable the permission "Presence.Read.All" |
|||
##Search and enable the permission "Presence.Read.All" |
|||
## Click the "Add permissions" button |
|||
# |
##Click the "Add permissions" button |
||
#Click the "Add a permission" button |
|||
## Select "Microsoft Graph" |
|||
##Select "Microsoft Graph" |
|||
## '''Select <font color="red">"Application permissions"</font>''' |
|||
##'''Select <font color="red">"Application permissions"</font>''' |
|||
## Search and enable the permission "User.Read.All" and "Presence.ReadWrite.All" |
|||
##Search and enable the permission "User.Read.All" and "Presence.ReadWrite.All" |
|||
## Click the "Add permissions" button |
|||
##Click the "Add permissions" button |
|||
# Click the "Grant admin consent" in which you all the app to have access to this presence data |
|||
#Click the "Grant admin consent" in which you all the app to have access to this presence data |
|||
# If all OK, it should be setup like the screenshot below |
|||
#If all OK, it should be setup like the screenshot below |
|||
<table> |
<table> |
||
| Line 168: | Line 173: | ||
</table> |
</table> |
||
== |
==Gather all needed information== |
||
* |
*'''Information''': If you have have followed all steps above, you would have the following information |
||
** |
**Directory (tenant) ID |
||
** |
**Application (client) ID |
||
** |
**Client secret value |
||
** |
**Client Secret expiry date (optional) |
||
** |
**API user |
||
** |
**API user password |
||
= |
=VTX Kiosk Setup= |
||
== |
==Enter API Credentials and Get VoIP platform certificate== |
||
<font color="red">'''This is the section that is not ready yet, in the meantime, we need to exchange the information with VTX with a secure channel'''</font> |
<font color="red">'''This is the section that is not ready yet, in the meantime, we need to exchange the information with VTX with a secure channel'''</font> |
||
* |
*'''Problematic''': Enter Azure API credentials and get the VoIP Platform certificate to upload in Azure AD |
||
* |
*'''Solution''': Follow procedure below |
||
# VTX will send you a secured way to send all the credentials above ( pending to allow you to do it directly in VTX Kiosk Selfcare Portal ) |
|||
# VTX will send you back a certificate to upload in Azure AD for API authentication to be used in next section |
|||
#VTX will send you a secured way to send all the credentials above ( pending to allow you to do it directly in VTX Kiosk Selfcare Portal ) |
|||
#VTX will send you back a certificate to upload in Azure AD for API authentication to be used in next section |
|||
== Add Mapping Between Phone Users and Teams Email == |
|||
==Add Mapping Between Phone Users and Teams Email== |
|||
* '''Problematic''': Now that the global API sync is in place, we need a mapping between the Phone Number and the Teams Email Address |
|||
* '''Problem''': It is not possible to set this from Kiosk Yet |
|||
* '''Workaround''': In the meantime, please provide a table to VTX with the list of Teams users and their VTX VoIP number in order to setup the mapping on VTX side |
|||
*'''Problematic''': Now that the global API sync is in place, we need a mapping between the Phone Number and the Teams Email Address |
|||
*'''Problem''': It is not possible to set this from Kiosk Yet |
|||
*'''Workaround''': In the meantime, please provide a table to VTX with the list of Teams users and their VTX VoIP number in order to setup the mapping on VTX side |
|||
= |
=Azure AD Setup Part 2= |
||
== |
==Upload VoIP Platform Certificate API== |
||
* |
*'''Problematic''': Upload the VoIP Platform API certificate to Azure |
||
* |
*'''Solution''': Follow procedure below |
||
# Get the vtx-api-certificate-cXXXXXX.pem from VTX |
|||
#Get the vtx-api-certificate-cXXXXXX.pem from VTX |
|||
# Connect to Azure AD, App Registration like before https://portal.azure.com/#view/Microsoft_AAD_IAM/ActiveDirectoryMenuBlade/~/RegisteredApps |
|||
#Connect to Azure AD, App Registration like before https://portal.azure.com/#view/Microsoft_AAD_IAM/ActiveDirectoryMenuBlade/~/RegisteredApps |
|||
# Go in the setup of "VTX MS365 Presence Sync cxxx" App registration |
|||
# |
#Go in the setup of "VTX MS365 Presence Sync cxxx" App registration |
||
# |
#Go in the "Certificate & secrets" |
||
#Go in the "Certificates" tab |
|||
# Click an Upload Certificate |
|||
#Click an Upload Certificate |
|||
## Browse the certificate on your PC retrieved in previous section |
|||
##Browse the certificate on your PC retrieved in previous section |
|||
## Add comment "MS Teams Cert from VTX for cXXXXX" |
|||
##Add comment "MS Teams Cert from VTX for cXXXXX" |
|||
## Click the "Add" button |
|||
##Click the "Add" button |
|||
<table> |
<table> |
||
| Line 221: | Line 227: | ||
</tr> |
</tr> |
||
</table> |
</table> |
||
= Rich Presence Mapping Teams / VoIP Platform = |
|||
<br /> |
|||
* '''Information''': The Rich Presence Write Permissions are really restricted on MS365. It means that we can map any Teams Presence to anything on the VoIP platform, but on the other direction, from VTX -> Teams, we can only set "Available" and "Away" status |
|||
'''Microsoft vs VTX VoIP Platform Rich Presence Mapping''' |
|||
{| class="wikitable" |
|||
!'''MS365 activity''' |
|||
! |
|||
! |
|||
!'''VTX VoIP Platform''' |
|||
'''Rich presence Activity''' |
|||
|- |
|||
|Be right back |
|||
|'''->''' |
|||
| |
|||
|On Break |
|||
|- |
|||
|Away |
|||
|'''->''' |
|||
| |
|||
|Away |
|||
|- |
|||
|Off work |
|||
|'''->''' |
|||
| |
|||
|Away |
|||
|- |
|||
|Offline |
|||
|'''->''' |
|||
| |
|||
|Away |
|||
|- |
|||
|Do not disturb |
|||
|'''->''' |
|||
| |
|||
|Do Not Disturb |
|||
|- |
|||
|Busy (Meeting) |
|||
|'''->''' |
|||
| |
|||
|In a Meeting |
|||
|- |
|||
|Busy (Time blocker) |
|||
|'''->''' |
|||
| |
|||
|In a Meeting |
|||
|- |
|||
|Out of office |
|||
|'''->''' |
|||
| |
|||
|Out of Office |
|||
|- |
|||
|Away |
|||
| |
|||
|'''<-''' |
|||
|Away |
|||
|- |
|||
|Away |
|||
| |
|||
|'''<-''' |
|||
|On Break |
|||
|- |
|||
|Away |
|||
| |
|||
|'''<-''' |
|||
|Do Not Disturb |
|||
|- |
|||
|Away |
|||
| |
|||
|'''<-''' |
|||
|Out of Office |
|||
|- |
|||
|Away |
|||
| |
|||
|'''<-''' |
|||
|Vacation |
|||
|- |
|||
|Away |
|||
| |
|||
|'''<-''' |
|||
|Sick Leave |
|||
|} |
|||
<br /> |
|||
Latest revision as of 10:59, 24 July 2023
With VTX VPBX Teams Presence Synchronisation, you can use the best of both VTX VPBX and MS Teams features syncing the "Rich Presence" status between Teams and VTX VPBX. I.e it means that call status and presence status ( "busy", "in a meeting", "presenting", "do not disturb") status are sync bidirectionally.
This feature could be used with or without the combination of VTX Teams Virtual service.
Introduction[edit | edit source]
- History: Since the upgrade of VTX VoIP platform to version 7 in late 2022, VTX VoIP platform does have an OpenAPI interface that allows to interact with other external tools. An a dedicated integrated framework has been developed to easily sync VTX and Teams Rich Presence
- How it works: We do have VTX and Teams APIs talking to each other to exchange real time information about presence status. A restricted API account needs to be created on both platforms to have them being able to talk to each other. Then, we only have to link each VPBX user with his Teams Email address to start the presence sync.
- What does it do : Sync VTX/Teams Rich Presence status in real time. Allowing not to be bothered by a Teams Call when on a "normal" VoIP call, or the other way around. Here are a few simple use cases
- Teams->C5: Be visible as "presenting" on VoIP platform while sharing screen in a Teams Call
- Teams->C5: Be visible as "in a meeting" on VoIP plarform while in a Teams Meeting in calendar
- C5->Teams: Be seen as busy in Teams while on the "normal" phone
Setup Process Overview[edit | edit source]
Here is the process that will allow you to setup the service
- Follow requirements below VoIP:VTX VPBX Teams Presence Synchronisation
- Perform Azure AD setup ( create Application + API User + Certificate )
- Perform VTX C5 Setup ( Link Credentials + Certificate)
- Setup VTX/Teams User mapping
"VTX VPBX Teams Presence Synchronisation" value added features[edit | edit source]
- Sync Rich Presence Status between VTX VPBX and MS Teams to benefit from both world without being visible as available when it is not the case
Requirements[edit | edit source]
You will find below all the needed requirements to use VTX VPBX Teams Presence Synchronisation Service
- a VTX VPBX Service
- A Microsoft 365 domain and accounts
- A Microsoft Azure Portal Admin account
Azure AD Setup Part 1[edit | edit source]
Create an Azure App Registration[edit | edit source]
- Problematic: We would like to create an Azure App Registration named "VTX MS365 Presence Sync" to sync VoIP Platform and Azure ( that we will restrict to presence status sync only afterwards)
- Solution: Follow procedure below
- Connect to https://portal.azure.com/ with an Admin Account of the domain you wish to sync presence status with the VoIP platform
- Select the "Azure Active Directory" service in the list ( if not visible, click on the "More service" option or search for it )
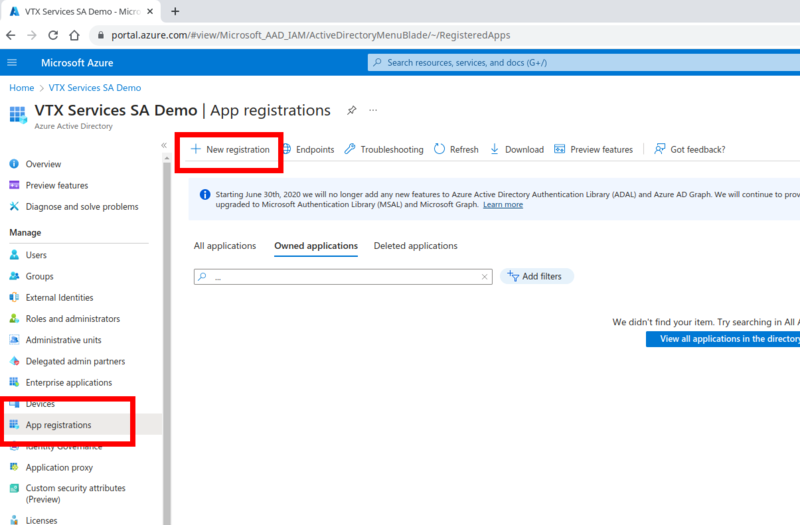
- Open the "App registrations" and create a new Registration in https://portal.azure.com/#view/Microsoft_AAD_IAM/ActiveDirectoryMenuBlade/~/RegisteredApps
- Name = "VTX MS365 Presence Sync c<CUSTOMERNUMBER>" ( ex: "VTX MS365 Presence Sync c429080" because 429080 is my VTX Test customer number)
- Set App as "Single tenant" access
- Click the "Register" button
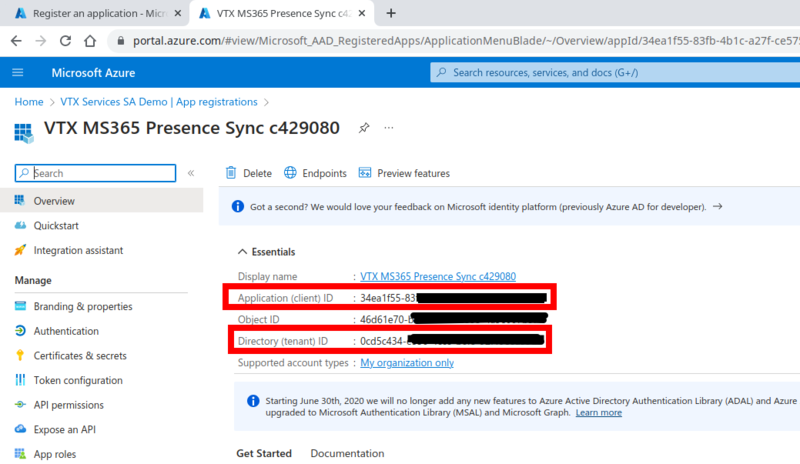
- Copy the value of "Directory (tenant) ID" in a notepad that will be required later (info n°1)
- Copy the value of "Application (client) ID" in a notepad that will be required later (info n°2)
Create a Client Secret[edit | edit source]
| The value if the secret only appears twice, you will need to create a new secret if you loose it |
| The secret is valid for a mixed amount of time, API authentication will fail once it expires, so you will need to create a new one and push it in VTX Kiosk menu on renewal. |
- Information: To authenticate an access to the App, we 1st create a "secret" key, we will create a certificate to enhance security even more in next sections
- Problematic: Within the "VTX MS365 Presence Sync" App, create a "Client secret"
- Solution: Follow procedure below
- Within the "VTX MS365 Presence Sync cXXXXX" app, go in the Certificates & secrets menu
- Go in the "Client secrets" Tab
- Click on "+ New client secret"
- Set Description = "MS365 Presence Client Secret cXXXXX"
- Set Expires = Maximum 730 days ( 24 months )
- Click the "Add" Button
- Copy now the "Value" of the secret in a notepad and store the value for later use (info n°3)
- Copy also the expiration date of the secret (info n°4)

Create API user MS365-Presence-Sync-cXXXXX[edit | edit source]
- Information: We need to create an API user that does not require any additional license. We set it up with restricted access to only allow bi-directional Rich Presence Sync for this user
- Problematic: Create an API user
- Solution: Follow procedure below
- Connect to Azure Portal user list https://portal.azure.com/#view/Microsoft_AAD_UsersAndTenants/UserManagementMenuBlade/~/AllUsers
- Click the "+ New user" button
- Set User name = MS365-Presence-Sync-cXXXXX @ "YOUR DOMAIN" and store information in notepad (info n°5). NB: The "DOMAIN" should be the same as the Teams user you wish to sync presence for
- Set Display Name = MS365 Presence Sync API User cXXXXX
- Create and Store Complex Password and store information in notepad (info n°6)
- Set the user as "Global Reader" for the time being

API Authentication - Allow public client flows[edit | edit source]
- Problematic: We need to allow public access to the App Registration "VTX MS365 Presence Sync" to be able to access it from the VTX VoIP platform
- Solution: Follow procedure below
- Go back in the app registration https://portal.azure.com/#view/Microsoft_AAD_IAM/ActiveDirectoryMenuBlade/~/RegisteredApps
- Select "VTX MS365 Presence Sync cXXXXX" app
- Go in "Authentication" menu
- In "Advanced settings", set "Allow public client flows" = Yes
- Click the "Save" button

API Permissions - All access to Presence Information in Read/Write mode[edit | edit source]
- Problematic: We need to restrict the app API permissions to Read/Write mode to presence data only
- Solution: Follow procedure below
- Go back in the app registration https://portal.azure.com/#view/Microsoft_AAD_IAM/ActiveDirectoryMenuBlade/~/RegisteredApps
- Select "VTX MS365 Presence Sync cXXXXX" app
- Go in the "API permissions" menu
- Delete the "User.Read" default permission that is not needed
- Click the "Add a permission" button
- Select "Microsoft Graph"
- Select "Delegated permissions"
- Search and enable the permission "Presence.Read.All"
- Click the "Add permissions" button
- Click the "Add a permission" button
- Select "Microsoft Graph"
- Select "Application permissions"
- Search and enable the permission "User.Read.All" and "Presence.ReadWrite.All"
- Click the "Add permissions" button
- Click the "Grant admin consent" in which you all the app to have access to this presence data
- If all OK, it should be setup like the screenshot below

Gather all needed information[edit | edit source]
- Information: If you have have followed all steps above, you would have the following information
- Directory (tenant) ID
- Application (client) ID
- Client secret value
- Client Secret expiry date (optional)
- API user
- API user password
VTX Kiosk Setup[edit | edit source]
Enter API Credentials and Get VoIP platform certificate[edit | edit source]
This is the section that is not ready yet, in the meantime, we need to exchange the information with VTX with a secure channel
- Problematic: Enter Azure API credentials and get the VoIP Platform certificate to upload in Azure AD
- Solution: Follow procedure below
- VTX will send you a secured way to send all the credentials above ( pending to allow you to do it directly in VTX Kiosk Selfcare Portal )
- VTX will send you back a certificate to upload in Azure AD for API authentication to be used in next section
Add Mapping Between Phone Users and Teams Email[edit | edit source]
- Problematic: Now that the global API sync is in place, we need a mapping between the Phone Number and the Teams Email Address
- Problem: It is not possible to set this from Kiosk Yet
- Workaround: In the meantime, please provide a table to VTX with the list of Teams users and their VTX VoIP number in order to setup the mapping on VTX side
Azure AD Setup Part 2[edit | edit source]
Upload VoIP Platform Certificate API[edit | edit source]
- Problematic: Upload the VoIP Platform API certificate to Azure
- Solution: Follow procedure below
- Get the vtx-api-certificate-cXXXXXX.pem from VTX
- Connect to Azure AD, App Registration like before https://portal.azure.com/#view/Microsoft_AAD_IAM/ActiveDirectoryMenuBlade/~/RegisteredApps
- Go in the setup of "VTX MS365 Presence Sync cxxx" App registration
- Go in the "Certificate & secrets"
- Go in the "Certificates" tab
- Click an Upload Certificate
- Browse the certificate on your PC retrieved in previous section
- Add comment "MS Teams Cert from VTX for cXXXXX"
- Click the "Add" button

Rich Presence Mapping Teams / VoIP Platform[edit | edit source]
- Information: The Rich Presence Write Permissions are really restricted on MS365. It means that we can map any Teams Presence to anything on the VoIP platform, but on the other direction, from VTX -> Teams, we can only set "Available" and "Away" status
Microsoft vs VTX VoIP Platform Rich Presence Mapping
| MS365 activity | VTX VoIP Platform
Rich presence Activity | ||
|---|---|---|---|
| Be right back | -> | On Break | |
| Away | -> | Away | |
| Off work | -> | Away | |
| Offline | -> | Away | |
| Do not disturb | -> | Do Not Disturb | |
| Busy (Meeting) | -> | In a Meeting | |
| Busy (Time blocker) | -> | In a Meeting | |
| Out of office | -> | Out of Office | |
| Away | <- | Away | |
| Away | <- | On Break | |
| Away | <- | Do Not Disturb | |
| Away | <- | Out of Office | |
| Away | <- | Vacation | |
| Away | <- | Sick Leave |