VoIP:LDAP
From VTX Public Wiki
Introduction LDAP[edit | edit source]
We use LDAP to manage a centralized directory that will be automatically updated on on all compatible phones. You can manage it in the VTX-Kiosk.
| Notice |
LDAP is not enabled by default and can only be used on all auto-provisioned phones, not on individual ones.
Enable LDAP phonebook via Kiosk (autoprovisioning)[edit | edit source]
LDAP can be enabled via VTX-Kiosk, so you don't have to manually input the LDAP-credentials on compatible, auto-provisioned phones.
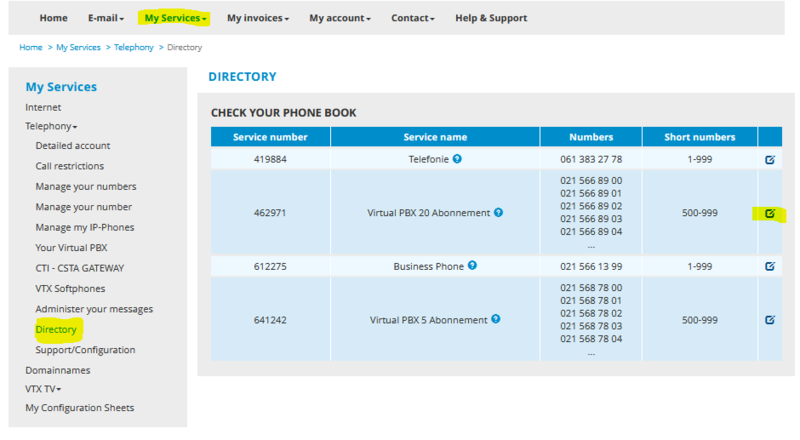
Go to the "Directory"-menu, under "My Services" and "Telephony", you can than choose the related phone-service and tap "show".
|
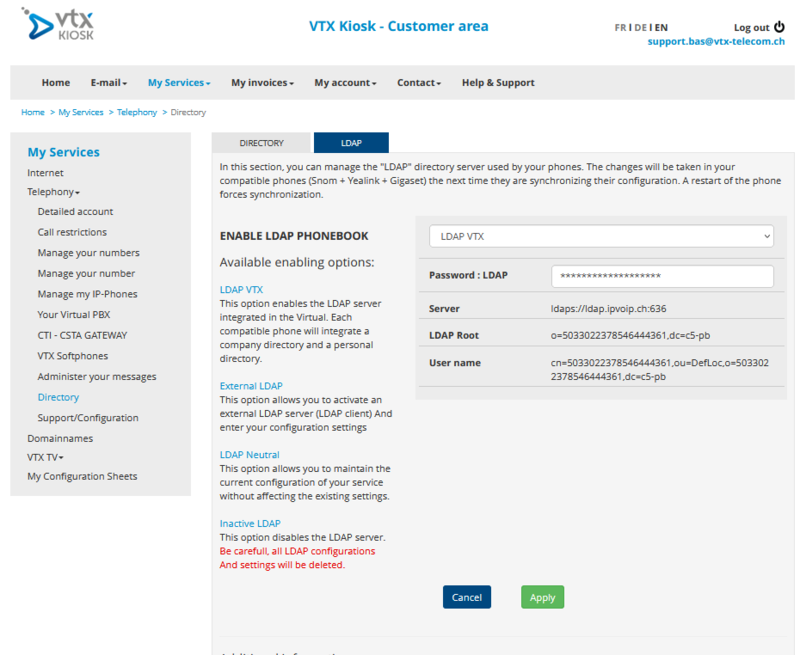
At this point you can choose how you want to enable LDAP: |
LDAP VTX[edit | edit source]This option enables the LDAP server integrated in the Virtual PBX. Each compatible phone will integrate a company directory and a personal directory. Please note that this works only with the VTX-LDAP, if you want to use your own LDAP-server, it has to be set up seperately.
External LDAP[edit | edit source]This option allows you to activate an external LDAP server (LDAP client) And enter your configuration settings
LDAP Neutral[edit | edit source]This option allows you to maintain the current configuration of your service without affecting the existing settings.
Inactive LDAP[edit | edit source]This option disables the LDAP server. Be carefull, all LDAP configurations And settings will be deleted.
|
FAQ LDAP[edit | edit source]
Use same VTX LDAP Server on different vPBX services[edit | edit source]
You wish to have same LDAP informations on different vPBX within VTX.
- Activate VTX LDAP on one of the vPBX Services
- Get the credentials of the VTX LDAP activated on this Service
- Connect to the Kiosk of the other vPBX Services
- Activate External LDAP on all other vPBX Services and enter the credentials of first VTX LDAP (example below)
LDAP VTX (from main vPBX Service)
Password LDAP: ********************
Server: ldaps://ldap.ipvoip.ch:636
LDAP Root: o=7992737673434069316,dc=c5-pb
User name: cn=7992737673434069316,ou=DefLoc,o=7992737673434069316,dc=c5-pb
External LDAP (credentials above and how to insert for all other vPBX Services)
Protocol: LDAPS (Secure)
Server: ldap.ipvoip.ch
Port: 636
LDAP Root: o=5033022378546444361,dc=c5-pb
User name: cn=5033022378546444361,ou=DefLoc
Password: ********************
My "External LDAP" setting is not working[edit | edit source]
- Problem: You have setup a Kiosk LDAP External setup and it is not working
- Problematic: You need to identify where the problem comes from ( credentials, network, firewall, LDAP Tree, ...)
- Information: When "External LDAP" get setup in Kiosk, the only thing that VTX are doing is to push these parameters in the Yealink + Snom + Gigaset phones
- Clue: Most of the problems comes from: the LDAP suffix get added to the username, problem will be visible in Phone Web Interface LDAP setup
- Solution: Here is how to debug the problem
- Phone : Connect to a phone (Yealink or Snom or Gigaset) and do a LDAP config screenshot to see how it is setup
- In Kiosk : Set back LDAP setting to "LDAP Neutral" to allow you to perform LDAP setup modification on the phone (For Snom, you need to factory reset the phone)
- Phone : Now setup your LDAP settings manually on the phone and have it working, debug the problem on the Phone and on the server
- Network : Your phone need to be able to reach the LDAP server
- Credentials : You need to enter the correct credentials on the phone to have it working
- Phone : Once you have a working LDAP setup on the phone, compare it to the one that was pushed by the Kiosk and update the Kiosk setup to have it working


